Recently I encountered a strange bug in eclipse after a colleague includes selenium in a pom file of a meven project. The eclipse complained " Error: archive required for library cannot be read". Detailed error like this:
"Description Resource Path Location Type Archive for required library: [root]/.m2/repository/org/seleniumhq/selenium/selenium-support/2.46.0/selenium-support-2.46.0.jar' in project '[*]' cannot be read or is not a valid ZIP file umom Build path Build Path Problem"
However, it was found that the selenium-support-2.46.0.jar is valid jar which can be open as zip.
After some searching, the following work around seems to work in my case (link: https://bugs.eclipse.org/bugs/show_bug.cgi?id=364653#c3):
Workaround: For each affected project set 'Incomplete build path' to 'Warning' on the Compiler > Building property page. After that, shut down and restart the eclipse. followed by update the maven projects. And the problem is gone
Friday, November 13, 2015
Thursday, November 12, 2015
Run mvn package with multiple modules containing independent pom files without public repository
Recently i need to build a java application which must be built with dependencies from several different modules, each having their own pom files that packages them into jar. As these files are not distributed from a public repository such as Maven Central and I do not reuse repository system such as Nexus in this case. The modules are in their own folders (with names such as "SK-Utils" "SK-Statistics" "SK-DOM" "OP-Core" "OP-Search" "ML-Core" "ML-Tune" "ML-Clustering" "ML-Trees"). What makes it complicated is that these modules actually have their dependencies specified on each other. E.g., ML-Core depends on "SK-DOM"and "SK-Utils" to build and run unit testing. Running these independent modules using IntelliJ IDE is ok. However, the modules failed to build when build using command lines such as "mvn package". Therefore i wrote a bash scripts which put in the same directory containing the independent modules. The bash script basically run "mvn package" using pom file in each module, then install them to the local repository. The bash script "mvn-build.sh" looks like the following:
Just run the above script using command such as "sudo ./mvn-build.sh" from its folder should build the multiple module project.
Note that each module should have a plugin like below specified so that the "jar-with-dependencies" jar will be generated.
One more note is that if you are running on environment such as centos linux and encounter "mvn: command not found" when executing "sudo ./mvn-build.sh", it may be due to the fact that the PATH environment variable not in the sudoer, in this case, just run
> sudo env "PATH=$PATH" ./mvn-build.sh
#!/usr/bin/env bash
dirArray=( "SK-Utils" "SK-Statistics" "SK-DOM" "OP-Core" "OP-Search" "ML-Core" "ML-Tune" "ML-Clustering" "ML-Trees")
for dirName in "${dirArray[@]}"
do
 echo $dirName
 cd $dirName

 jarPath="target/$dirName-0.0.1-SNAPSHOT-jar-with-dependencies.jar"

 if [ -d $jarPath ]; then
     chmod 777 $jarPath
 fi

    mvn package


    mvn install:install-file -Dfile=$jarPath -DgroupId=com.meme -DartifactId=$dirName -Dpackaging=jar -Dversion=0.0.1-SNAPSHOT


    cd ..
done
Just run the above script using command such as "sudo ./mvn-build.sh" from its folder should build the multiple module project.
Note that each module should have a plugin like below specified so that the "jar-with-dependencies" jar will be generated.
<build>
        <plugins>
            <plugin>
                <groupId>org.apache.maven.plugins</groupId>
                <artifactId>maven-install-plugin</artifactId>
                <version>2.5.2</version>
            </plugin>
            <plugin>
                <groupId>org.apache.maven.plugins</groupId>
                <artifactId>maven-assembly-plugin</artifactId>
                <version>2.6</version>
                <configuration>
                    <descriptorRefs>
                        <descriptorRef>jar-with-dependencies</descriptorRef>
                    </descriptorRefs>
                </configuration>

                <executions>
                    <execution>
                        <id>make-assembly</id>
                        <phase>package</phase>
                        <goals>
                            <goal>single</goal>
                        </goals>
                    </execution>
                </executions>
            </plugin>
        </plugins>
    </build>
One more note is that if you are running on environment such as centos linux and encounter "mvn: command not found" when executing "sudo ./mvn-build.sh", it may be due to the fact that the PATH environment variable not in the sudoer, in this case, just run
> sudo env "PATH=$PATH" ./mvn-build.sh
Saturday, November 7, 2015
Use HttpURLConnection to send a "GET" command to Elastic Search with a json body (enum "-d" option in curl's GET)
Recently I was working on implementing a java equivalence using HttpURLConnection to the following curl query which sends a "GET" command to elastic search with a json body specified in the "-d" option of curl command, something like the one below:
The command requires a json body to be sent to the elastic search via the "GET" restful call. After some trial and error, I got this to work, below is the method implemented in Java.
curl -XGET "http://127.0.0.1:9200/messages/_search?pretty" -d '
{
  "size" : 10,
  "query" : {
    "bool" : {
      "must" : [ {
        "match" : {
          "id" : {
            "query" : "[some id]",
            "type" : "boolean"
          }
        }
      },  {
        "nested" : {
          "query" : {
            "bool" : {
              "must" : {
                "match" : {
                  "agent" : {
                    "query" : "[some agent name]",
                    "type" : "boolean"
                  }
                }
              }
            }
          },
          "path" : "agents"
        }
      } ]
    }
  }
  }
}
The command requires a json body to be sent to the elastic search via the "GET" restful call. After some trial and error, I got this to work, below is the method implemented in Java.
 public static String httpGet(String urlToRead, String data) {
        URL url;
        HttpURLConnection conn;
        BufferedReader rd;
        String line;
        StringBuilder result = new StringBuilder();
        try {
            url = new URL(urlToRead);
            conn = (HttpURLConnection) url.openConnection();
            conn.setDoOutput(true);
            conn.setRequestMethod("GET");
            BufferedWriter writer = new BufferedWriter(new OutputStreamWriter(conn.getOutputStream()));
            writer.write(data);
            writer.flush();

            rd = new BufferedReader(new InputStreamReader(conn.getInputStream()));
            while ((line = rd.readLine()) != null) {
                result.append(line);
            }
            rd.close();
        } catch (IOException e) {
            e.printStackTrace();
        } catch (Exception e) {
            e.printStackTrace();
        }
        return result.toString();
}
To call the above method and realize the curl query to ES above. just implement the following:
int size = 10;
String ipAddress = "127.0.0.1";
String url = "http://"+ipAddress+":9200/messages/_search?pretty";
String data = " { \"size\" : "+size+", \"query\" : { \"bool\" : { \"must\" : [ { \"match\" : { \"id\" : { \"query\" : \"[some id]\", \"type\" : \"boolean\" } } }, { \"nested\" : { \"query\" : { \"bool\" : { \"must\" : { \"match\" : { \"agent\" : { \"query\" : \"[some agent name]\", \"type\" : \"boolean\" } } } } }, \"path\" : \"agents\" } } ] } } } ";
String response = httpGet(url, data);
Tuesday, November 3, 2015
Create and Run Apache Spark Scala project using Eclipse and SBT
This post shows a simple way to create and run a apache spark scala project using eclipse and SBT. Following this post at link (http://czcodezone.blogspot.sg/2015/11/create-scala-project-using-scala-ide.html) to create a SBT-compatiable scala project in Scala IDE, open the build.sbt in the project and add the following line towards the end of the file.
Further more, since Spark needs to run a spark cluster in a jar, a sbt plugin must be added for the packaging. Create a file named "assembly.sbt" in the "project" folder under the root directory and put the following content:
Now in the command line, navigate to the project root directory and run "sbt compile", "sbt package" command after you put in your spark scala code, then "sbt run" or "spark-submit" depending on whether you want to run it locally or submit to spark cluster
libraryDependencies += "org.apache.spark" %% "spark-core" % "1.5.1"
Further more, since Spark needs to run a spark cluster in a jar, a sbt plugin must be added for the packaging. Create a file named "assembly.sbt" in the "project" folder under the root directory and put the following content:
addSbtPlugin("com.eed3si9n" % "sbt-assembly" % "0.11.2")
Now in the command line, navigate to the project root directory and run "sbt compile", "sbt package" command after you put in your spark scala code, then "sbt run" or "spark-submit" depending on whether you want to run it locally or submit to spark cluster
Create a Scala project using Scala-IDE and SBT on CentOS
This post shows how to create and build a Scala project using Scala IDE and SBT (Simple Build Tool)
Download, unzip and launch the Scala IDE (link: http://scala-ide.org/), use the IDE to create a Scala project (said, with a name "ScalaHelloWorld")
> curl https://bintray.com/sbt/rpm/rpm | sudo tee /etc/yum.repos.d/bintray-sbt-rpm.repo
> sudo yum install sbt
After installing the SBT, navigate to your "ScalaHelloWorld" root directory and create a build.sbt file in the directory with the following content:
Next in the root directory create a folder named "project" and create plugins.sbt file in the created "project" folder, with the following content:
Now go back to the root directory and in the command line enter the following command:
> sbt eclipse
This will setup the eclipse scala project for sbt to work with. To begin writing Scala implementation, a simple recommendation with to create the folder structures like the following in the "src" folder under the root directory:
src/main/scala
src/main/resources
src/test/scala
src/test/resources
Now in the Scala IDE, right-click the folder "src/main/scala" and "src/test/scala" and select "Build Path -> Use as Source Folder", and just create your .scala file in these folders.
Step 4: Run SBT
After you code your scala implementation, navigate to the project root directory and type the following command to run the unit test codes:
> sbt test
And the following command to launch the app in main:
> sbt run
Step 1: Create a Scala project using Scala IDE
Download, unzip and launch the Scala IDE (link: http://scala-ide.org/), use the IDE to create a Scala project (said, with a name "ScalaHelloWorld")
Step 2: Install SBT
Download and install SBT using the following command:> curl https://bintray.com/sbt/rpm/rpm | sudo tee /etc/yum.repos.d/bintray-sbt-rpm.repo
> sudo yum install sbt
Step 3: Configure Scala project for SBT
After installing the SBT, navigate to your "ScalaHelloWorld" root directory and create a build.sbt file in the directory with the following content:
name := "File Searcher"

version := "1.0"

scalaVersion := "2.10.4"

libraryDependencies += "org.scalatest" % "scalatest_2.10" % "2.0" % "test"
Next in the root directory create a folder named "project" and create plugins.sbt file in the created "project" folder, with the following content:
addSbtPlugin("com.typesafe.sbteclipse" % "sbteclipse-plugin" % "4.0.0")
Now go back to the root directory and in the command line enter the following command:
> sbt eclipse
This will setup the eclipse scala project for sbt to work with. To begin writing Scala implementation, a simple recommendation with to create the folder structures like the following in the "src" folder under the root directory:
src/main/scala
src/main/resources
src/test/scala
src/test/resources
Now in the Scala IDE, right-click the folder "src/main/scala" and "src/test/scala" and select "Build Path -> Use as Source Folder", and just create your .scala file in these folders.
Step 4: Run SBT
After you code your scala implementation, navigate to the project root directory and type the following command to run the unit test codes:
> sbt test
And the following command to launch the app in main:
> sbt run
Wednesday, October 28, 2015
Unit Testing of AngularJS in Spring MVC maven project using Jasmine, PhantomJS, and Jenkins CI
This post is about some links on how to perform unit testing of angularjs in spring MVC project. One typical setup is with Jasmine and phantomjs.
Some general descriptions of these tools: jasmine is a behavior-driven development framework for testing javascript, phantomjs is a headless browser, which can be invoked on Jenkins CI to run unit testing of angularjs (Jenkins CI is a continuous integration server that supports building and testing of software projects)
Firstly includes the following in your maven POM file
In the <plugins> section two plugins, namely jasmine and phantomjs maven plugins are added. The jasmine plugin is for jasmine to be used for unit testing and the phantomjs will download the phantomjs executable into a tmp folder so that it can be invoked to run the unit testing by Jenkins. The phantomjs maven plugin is very useful in that when the project is fetched by Jenkins CI to perform testing, the machine running Jenkins CI may not have phantomjs pre-installed. With the phantomjs maven plugin and the "install" goal specified in it, the Jenkins will search locally whether a copy of phantomjs is available in the specified phantomjs.outputDir folder, if not, it will download from the internet and put it in the phantomjs.outputDir folder, and after that the plugin set the phantomjs.binary parameter automatically, so that Jenkins CI knows where to find the phantomjs executable.
The org.eclipse.m2e lifecycle-mapping specified in the <pluginManagement> is used to stop Eclipse from complaining m2e cannot under the "install" goal specified in the phantomjs maven plugin. It does not have any effect on maven when it builds and run the project.
For this, there is already a nice article on how to do it here at:
https://spring.io/blog/2015/05/19/testing-an-angular-application-angular-js-and-spring-security-part-viii
Therefore I won't repeat it.
Some general descriptions of these tools: jasmine is a behavior-driven development framework for testing javascript, phantomjs is a headless browser, which can be invoked on Jenkins CI to run unit testing of angularjs (Jenkins CI is a continuous integration server that supports building and testing of software projects)
POM setup
Firstly includes the following in your maven POM file
<properties>
<angularjs.version>1.4.3-1</angularjs.version>
<phantomjs.outputDir>${java.io.tmpdir}/phantomjs</phantomjs.outputDir>
</properties>

<build>
  <pluginManagement>
        <plugins>
            <!--This plugin's configuration is used to store Eclipse m2e settings
                only. It has no influence on the Maven build itself. -->
            <plugin>
                <groupId>org.eclipse.m2e</groupId>
                <artifactId>lifecycle-mapping</artifactId>
                <version>1.0.0</version>
                <configuration>
                    <lifecycleMappingMetadata>
                        <pluginExecutions>
                            <pluginExecution>
                                <pluginExecutionFilter>
                                <groupId>com.github.klieber</groupId>
              <artifactId>phantomjs-maven-plugin</artifactId>
                                    <versionRange>
                                        [0.7,)
                                    </versionRange>
                                    <goals>
                                        <goal>install</goal>
                                    </goals>
                                </pluginExecutionFilter>
                                <action>
                                    <ignore></ignore>
                                </action>
                            </pluginExecution>
                        </pluginExecutions>
                    </lifecycleMappingMetadata>
                </configuration>
            </plugin>
        </plugins>
    </pluginManagement>

<plugins>

<plugin>
          <groupId>com.github.klieber</groupId>
          <artifactId>phantomjs-maven-plugin</artifactId>
          <version>0.7</version>
          <executions>
            <execution>
              <goals>
                <goal>install</goal>
              </goals>
            </execution>
          </executions>
          <configuration>
            <version>1.9.7</version>
          </configuration>
        </plugin>
   <plugin>
     <groupId>com.github.searls</groupId>
     <artifactId>jasmine-maven-plugin</artifactId>
     <version>2.0-alpha-01</version>
     <executions>
       <execution>
         <goals>
           <goal>test</goal>
         </goals>
       </execution>
     </executions>


     <configuration>
       <additionalContexts>
         <context>
           <contextRoot>/lib</contextRoot>
           <directory>${project.build.directory}/generated-resources/unit/ml/js</directory>
         </context>
       </additionalContexts>
       <skipTests>true</skipTests>
       <preloadSources>
          <source>/webjars/jquery/2.1.3/jquery.min.js</source>
     <source>/webjars/bootstrap/3.3.5/js/bootstrap.min.js</source>
     <source>/webjars/angularjs/${angularjs.version}/angular.min.js</source>
     <source>/webjars/angularjs/${angularjs.version}/angular-route.min.js</source>
     <source>/webjars/angularjs/${angularjs.version}/angular-animate.min.js</source>

      <source>/webjars/angularjs/${angularjs.version}/angular-mocks.js</source>
       </preloadSources>
       <jsSrcDir>${project.basedir}/src/main/resources/js</jsSrcDir>
       <jsTestSrcDir>${project.basedir}/src/test/resources/js</jsTestSrcDir>
       <webDriverClassName>org.openqa.selenium.phantomjs.PhantomJSDriver</webDriverClassName>
      <webDriverCapabilities>
     <capability>
      <name>phantomjs.binary.path</name>
      <value>${phantomjs.binary}</value>
     </capability>
    </webDriverCapabilities>
     </configuration>
   </plugin>
  </plugins>


<build>
In the <plugins> section two plugins, namely jasmine and phantomjs maven plugins are added. The jasmine plugin is for jasmine to be used for unit testing and the phantomjs will download the phantomjs executable into a tmp folder so that it can be invoked to run the unit testing by Jenkins. The phantomjs maven plugin is very useful in that when the project is fetched by Jenkins CI to perform testing, the machine running Jenkins CI may not have phantomjs pre-installed. With the phantomjs maven plugin and the "install" goal specified in it, the Jenkins will search locally whether a copy of phantomjs is available in the specified phantomjs.outputDir folder, if not, it will download from the internet and put it in the phantomjs.outputDir folder, and after that the plugin set the phantomjs.binary parameter automatically, so that Jenkins CI knows where to find the phantomjs executable.
The org.eclipse.m2e lifecycle-mapping specified in the <pluginManagement> is used to stop Eclipse from complaining m2e cannot under the "install" goal specified in the phantomjs maven plugin. It does not have any effect on maven when it builds and run the project.
Implement Jasmine and spring unit testing codes
For this, there is already a nice article on how to do it here at:
https://spring.io/blog/2015/05/19/testing-an-angular-application-angular-js-and-spring-security-part-viii
Therefore I won't repeat it.
Tuesday, October 27, 2015
Building Asynchronous RESTful Services With Spring MVC and Guava
Recently I was working some asynchronous RESTful services in the Spring MVC framework in which i am thinking of using Guava to reduce the effort in development. After failing to find any good reference on using Guava with Spring MVC's asynchronous RESTful operation, I decide to do it by trial and error. In the end, it turned out to be quite easy. This post shows how to develop asynchronous RESTful services with spring mvc and google's Guava library.
Firstly includes the dependencies for Guava in your spring MVC project.
Now write a simple spring service something like the one below:
As shown in the code above the service has a method which delay a number user-specified milliseconds before returning a Date object. Next write a simple controller that autowires with the service:
This completes the coding part. There are two notes apart from the above implementation in order to make the asynchronous RESTful service to work:
The first thing is that the user needs to add in the following XML element into their web.xml configuration
<async-supported>true</async-supported>
This should be put under both <servlet> section (for the servlet which contains the spring controller above) as well as the <filter> section of the "org.springframework.web.filter.DelegatingFilterProxy"
<Connector asyncTimeout="60000" ... >
If you are using javascript to interact with the asynchronous RESTful services, you may also need to specify the timeout property (e.g., in the $http of angularjs) so that the http call will not terminate before the asynchronous service call is completed.
Firstly includes the dependencies for Guava in your spring MVC project.
Implementation using Guava in Spring MVC
Now write a simple spring service something like the one below:
import com.google.common.util.concurrent.ListenableFuture;
import com.google.common.util.concurrent.ListeningExecutorService;
import com.google.common.util.concurrent.MoreExecutors;

import java.util.concurrent.Callable;
import java.util.concurrent.Executors;

import java.util.Date;

import org.springframework.beans.factory.annotation.Autowired;
import org.springframework.stereotype.Service;

@Service
public class MyLongRunningServiceImpl extends MyLongRunningService {
   private ListeningExecutorService service;

   public MyLongRunningService(){
     service = MoreExecutors.listeningDecorator(Executors.newFixedThreadPool(10));
   }

   public ListenableFuture<Date> doLongRunningProcess(final int milliseconds){
 ListenableFuture<date> future = service.submit(new Callable<date>() {
            public Date call() throws Exception {
                Thread.sleep(milliseconds
                return new Date();
            }
        });

 return future;
   }
}
As shown in the code above the service has a method which delay a number user-specified milliseconds before returning a Date object. Next write a simple controller that autowires with the service:
import org.springframework.beans.factory.annotation.Autowired;
import org.springframework.web.context.request.async.DeferredResult;


@Controller
public class MyLongRunningController {
  @Autowired
  private MyLongRunningService service;

  @RequestMapping(value="/longRun", method = RequestMethod.GET)
 public @ResponseBody DeferredResult<Date> doLongRunningProcess(){

  DeferredResult<Date> deferredResult = new DeferredResult<>();


  logger.info("start long running process");


  ListenableFuture<Date> future = service.doLongRunningProcess(60000);

  Futures.addCallback(future, new FutureCallback<Date>(){

   @Override
   public void onFailure(Throwable throwable) {
    logger.error("long running process failed", throwable);

   }

   @Override
   public void onSuccess(Date res) {
    logger.info("long running process returns");


    deferredResult.setResult(res);
   }

  });


  return deferredResult;
 }
}
This completes the coding part. There are two notes apart from the above implementation in order to make the asynchronous RESTful service to work:
<async-supported>true</async-supported>
The first thing is that the user needs to add in the following XML element into their web.xml configuration
<async-supported>true</async-supported>
This should be put under both <servlet> section (for the servlet which contains the spring controller above) as well as the <filter> section of the "org.springframework.web.filter.DelegatingFilterProxy"
asyncTimeout
If you are using Tomcat server as the servlet and http container for your spring MVC, that the asyncTimeout need to be added into the <Connector> element of the /conf/server.xml in tomcat directory, so that async services won't be terminated before tomcat's timeout, e.g.,<Connector asyncTimeout="60000" ... >
If you are using javascript to interact with the asynchronous RESTful services, you may also need to specify the timeout property (e.g., in the $http of angularjs) so that the http call will not terminate before the asynchronous service call is completed.
Install Nide on CentOS
One headache i have is with the use of vi on command line of VM to edit complex script. I recently found the alternative of using Nide. Nide is a web-based editor which allows user to remotely view and edit files in a VM using a web interface. this post shows a step-by-step installation guide on how to make it run on centos or scientific linux
> cd /opt
> wget http://nodejs.org/dist/v0.10.30/node-v0.10.30.tar.gz
Install nodejs in VM
To install nodejs on centos, run the following commands:> cd /opt
> wget http://nodejs.org/dist/v0.10.30/node-v0.10.30.tar.gz
> tar xvzf node-v0.10.30.tar.gz
> cd node-v0.10.30
> ./configure
> sudo yum install gcc gcc-c++
> make
> make-install
Now run the following command to see if it is installed:
> node --version
Install npm in VM
To install npm, run the following commands
> curl -SL https://rpm.nodesource.com/setup | bash -
Run the following command to see if it is installed:
> npm --version
Install nide
Run the following command to install nide
> npm install -g nide
Run nide in VM
After nide is installed, before proceed to launch it, the first thing is to make sure that the port that it listen can be accessible from VM, if not run some command like the following to open the port (in this case, it is port 80):
> iptables -I INPUT 5 -i eth0 -p tcp --dport 80 -m state --state NEW,ESTABLISHED -j ACCEPT
One more thing to make sure before the launching is to make sure that the node_modules in which nide is installed have the proper permission, by running the following command:
> sudo chown -R $USER /usr/local/lib/node_modules
Now, one can launch the nide at port 80 using the following command:
> nide init -p 80
And you can go to your local machine, and enter the address "http://[VM-IP]" (where VM-IP is the ip address of the VM, since you are running nide at port 80 here, no need to add the port number). Now you are free to view and edit files in your VM.
Saturday, October 17, 2015
Eclipse Tomcat: class path resource [properties/server-${spring.profiles.active}.properties] cannot be opened because it does not exist
Today I encounter this error when working on a spring project in eclipse when trying to start the tomcat server on the spring mvc project:
"class path resource [properties/server-${spring.profiles.active}.properties] cannot be opened because it does not exist"
The issues turned out to be that the spring project has two properties files: namely server-dev.properties and server-production.properties. The project define a property "spring.profiles.active" which need to be supplied to the tomcat server when launching the spring mvc project so that the proper properties file can be loaded. The problem occurred because i was did not specify the argument when launching the project. To resolve this, double click the tomcat server instance in the "Servers" window in Eclipse and click the "Overview" tab. In the "Overview" tab, click "Open launch configuration" link. In the "Edit Configuration" dialog opened, click the "Arguments" tab, and append the following to the "VM arguments" textbox:
-Dspring.profiles.active=dev
Thursday, October 15, 2015
Scentific Linux / CentOS: investigate system error
Some simple commands to check system errors in centos or scentific linux:
To check the list of errors:
> grep -i error /var/log/messages
To check login:
> tail --lines=200 /var/log/secure
To check when the system is shutdown:
> grep -i shutdown /var/log/messages
Under centos the /var/log/messages is equivalent to /var/log/syslog in Ubuntu
To check the list of errors:
> grep -i error /var/log/messages
To check login:
> tail --lines=200 /var/log/secure
To check when the system is shutdown:
> grep -i shutdown /var/log/messages
Under centos the /var/log/messages is equivalent to /var/log/syslog in Ubuntu
Eclipse: Black tooltip background when running eclipse on centos and scentific linux
I have been use eclipse for java development but recently i migrated the eclipse over from centos and scentific linux, now the eclipse running on centos and scentific linux have a black tooltip when user hover over the codes. The problem seems to be related to GTK which eclipse use.
Solution:
Create a "start.sh" in the eclipse root folder, make it executable. then put the following two lines in the files:
Now launch the "start.sh" instead of "eclipse" executable.
While the above solution seems to temporarily solve the black tooltip problem for me, eclipse will occasionally crash due to issues button size cannot be determined. Today, my colleague comes up with a better solution which is to replace the default desktop environment in centos with the xfce http://www.xfce.org/. This completely remove the issue with black tooltip background in eclipse.
Solution:
Create a "start.sh" in the eclipse root folder, make it executable. then put the following two lines in the files:
export SWT_GTK3=0
./eclipse
Now launch the "start.sh" instead of "eclipse" executable.
While the above solution seems to temporarily solve the black tooltip problem for me, eclipse will occasionally crash due to issues button size cannot be determined. Today, my colleague comes up with a better solution which is to replace the default desktop environment in centos with the xfce http://www.xfce.org/. This completely remove the issue with black tooltip background in eclipse.
Wednesday, October 14, 2015
Nexus: Maven pulls everything but the main jar of drools and jboss through POM dependency
I encountered an error in the eclipse in which maven was not able to pull jar files as specified in the pom file related to the drools.6.3.0.Final. The library files are pulled from a local Nexus repository in which both the jboss public proxy has been setup and added in the mirrors of the local maven settings.xml file.
The problem turned out to be that the pom file in the folder '/root/.m2/repository/org/jboss/dashboard-builder/dashboard-builder-bom/6.3.0.Final/" is named as "
dashboard-builder-bom-6.3.0.Final.pom.lastUpdated" instead of "
dashboard-builder-bom-6.3.0.Final.pom".
After renamed the pom file back and do a maven force update on the project in eclipse the error was gone.
Tuesday, October 13, 2015
Redis: Running redis server in docker container and access it from Windows host
Start the boot2docker on Windows host, run the following commands to create a container instance:
> docker run -i -t -p 6379:6379 --name=redis ubuntu bash
Note that the "-p 6379:6379" expose the port 6379 (which is the port on which redis server run by default) of the docker container as the port of the docker vm, so that it can be accessed from the Windows host. In the "redis" container, run the following command to install the necessary tools for building redis:
> sudo apt-get update
> sudo apt-get upgrade
> sudo apt-get install build-essential
> sudo apt-get install tk8.5 tcl8.5
> sudo apt-get install wget
In the "redis" container, run the following command to download and build the redis
> cd /opt
> wget http://download.redis.io/redis-stable.tar.gz
> tar xvzf redis-stable.tar.gz
> cd redis-stable
> make distclean
> make test
In the "redis" container, run the following command to start running the redis server:
> cd /opt/redis-stable/src
> ./redis-server
Open a console windows on the Windows host and type the following command to find out the boot2docker ip address:
> boot2docker ip
which should return something like 192.168.59.103 (Note that the address 192.169.59.103 is the ip address of the docker vm, which by default the docker container is mapped to)
Now start a redis client from the Windows console windows (if you have not downloaded the redis client binary, can download it from https://github.com/ServiceStack/redis-windows) by entering the following command line in the console of the Windows host:
> cd [your-redis-windows-binary-directory]
> redis-cli.exe -h 192.168.59.103
That's it. This is the link to some C# demo code (using the ServiceStack.Redis library via nuget) which connect to the redis server running in the docker container:
https://dl.dropboxusercontent.com/u/113201788/Redis/RedisDemoCSharp.zip
Thursday, June 18, 2015
Lessons on setup DevStack on a single server instance running AWS EC2
These are some lessons which I learned when I was trying out the openstack on the AWS EC2 server instance.
Before one starts, it is a good idea to make sure that one does not run an operational mysql in the server instance. Openstack's controller node requires mariadb, which kinds of replace the default mysql. I encountered several errors on a testing instance in which mysql was installed prior and operating. Installing openstack in this case failed with errors such as "unit mariadb.service failed to load: no such file or directory" when running "sudo service mariadb start" during the "./.stack.sh" execution.
Another important lesson is that one must make sure the server instance is allocated enough memory, openstack requires large amount of memory, AWS EC2 instance such as t1.micro instance usually is not sufficient to run the DevStack (at least in my case)
If you do not have git instance, run the following commands to install git:
> sudo apt-get update
> sudo apt-get install git
After that, can follow the guidelines from the link here to set up:
Link: http://docs.openstack.org/developer/devstack/
If you want to install devstack in docker container of a sort, can try the dockenstack (https://github.com/ewindisch/dockenstack), my experience with it is that it did not work well for me though.
Wednesday, June 17, 2015
docker on centos 7: are you trying to connect to a tls-enabled daemon without tls
After install docker on centos 7 and try to run a simple docker command such as "sudo docker images", it failes with this error message:
"Get http:///var/run/docker.sock/v1.18/images/json: dial unix /var/run/docker.sock: permission denied. Are you trying to connect to a TLS-enabled daemon without TLS?"
After some trial and error, it appears that centos actually does not launch docker service (not sure something to do with firewall in centos 7), anyway, running the "sudo service docker start" fix the problem.
Install and start docker on centos 7
Nice post on how to install and start docker on centos 7:
Link: http://www.liquidweb.com/kb/how-to-install-docker-on-centos-7/
Link: http://www.liquidweb.com/kb/how-to-install-docker-on-centos-7/
Deploy spring mvc application in cloud
After login to the cloud computing instance, run either the "uname -a" or "cat /etc/redhat-release" to discuss the linux os version of the instance.
Follows the following link to install and run tomcat server:
http://tecadmin.net/install-tomcat-8-on-centos-rhel-and-ubuntu
If your spring mvc uses MySQL for database backend, follows the following link to install and run mysql:
http://www.rackspace.com/knowledge_center/article/installing-mysql-server-on-centos
(for centos 7): https://devops.profitbricks.com/tutorials/install-mysql-on-centos-7/
Once you have the environment setup, follow the link below to deploy your Spring MVC framework into the cloud computing instance:
link: http://www.mkyong.com/maven/how-to-deploy-maven-based-war-file-to-tomcat/
Check Linux OS version of a cloud computing instance
To list the linux kernel version, etc, run:
> uname -a
If the os is redhat family, run:
> cat /etc/redhat-release
> uname -a
If the os is redhat family, run:
> cat /etc/redhat-release
Wednesday, May 27, 2015
Spring: AngularJS login integration with Spring Security (Spring Security 3 and Spring Security 4)
This post shows how to use angularjs for login to spring mvc with spring security set to custom <form-login>
The login.js looks like the following:
The login.js looks like the following:
Spring security 3
Below is the login.jsp
<%@ taglib prefix="c" uri="http://java.sun.com/jsp/jstl/core" %>
<html>
<head ng-app="login-module">
<script src="angular.min.js"></script>
<script src="login.js"></script>
</head>
<body ng-controller="MainController">
<form>
<input type="text" name="username" ng-model="myusername" />
<input type="password" name="password" ng-model="mypassword" />
<button ng-click="login('<c:url value="/" />', myusername, mypassowrd)" />
</form>
</body>
</html>
The login.js looks like the following:
(function(){
 var MainController = function($scope, $http, $log){

  var encode4form = function(data){
   var result="";
   var first = true;
   for(var key in data)
   {
    if(first){
     first=false;
    }
    else{
     result+="&"
    }
    result+=(key + "=" + data[key]);
   }
   $log.info(result);
   return result;
  };

  $scope.login = function(myspringappname, myusername, mypassword){
   $http(
     {
      url: "/"+myspringappname+"/j_spring_security_check",
      method:"POST",
      data: encode4form({
       j_username: myusername,
       j_password: mypassword
       }),
      headers:
      {
       "Content-Type":"application/x-www-form-urlencoded; charset=UTF-8",
      }
     }
   ).success(function(response){
    $log.info(response);
   });
  };


  var onError = function(reason){
   $log.error(reason);
   alert(reason);
  };


 };

 var module=angular.module("login-module", []);
 module.controller("MainController", ["$scope", "$http", "$log", MainController]);
}());
Spring Security 4
Below is the login.jsp:
<%@ taglib prefix="c" uri="http://java.sun.com/jsp/jstl/core" %>
<html>
<head ng-app="login-module">
<script src="angular.min.js"></script>
<script src="login.js"></script>
</head>
<body ng-controller="MainController">
<form>
<input type="text" name="username" ng-model="myusername" />
<input type="password" name="password" ng-model="mypassword" />
<button ng-click="login('<c:url value="/" />', myusername, mypassowrd, '${_csrf.token}')" />
</form>
</body>
</html>
The login.js looks like the following:
(function(){
 var MainController = function($scope, $http, $log){

  var encode4form = function(data){
   var result="";
   var first = true;
   for(var key in data)
   {
    if(first){
     first=false;
    }
    else{
     result+="&"
    }
    result+=(key + "=" + data[key]);
   }
   $log.info(result);
   return result;
  };

  $scope.login = function(myspringappname, myusername, mypassword, mycsrf){
   $http(
     {
      url: "/"+myspringappname+"/login",
      method:"POST",
      data: encode4form({
       username: myusername,
       password: mypassword,
       _csrf: mycsrf
       }),
      headers:
      {
       "Content-Type":"application/x-www-form-urlencoded; charset=UTF-8",
      }
     }
   ).success(function(response){
    $log.info(response);
   });
  };


  var onError = function(reason){
   $log.error(reason);
   alert(reason);
  };


 };

 var module=angular.module("login-module", []);
 module.controller("MainController", ["$scope", "$http", "$log", MainController]);
}());
Spring: Migrating from spring security 3.2.6 to spring security 4.0.0
In this post, i document some changes i went through to successfully migrate from security 3.2.6 to spring security 4.0.0
<http auto-config="true">
For spring security 3.2.6, the following is implied:
Changes in <http> in security-config.xml
In security-config.xml, if you have the <http> section set to:<http auto-config="true">
For spring security 3.2.6, the following is implied:
- <http auto-config="true"> is same as <http auto-config="true" use-expressions="false">
- <http auto-config="true"> is same as <http auto-config="true" use-expressions="true">
Therefore, need to be careful if you do not use expressions, as in that case you need to set use-expressions="false" in the <http> element
Changes in JSP views
In spring security 4.0.0, the csrf is enabled by default, which is equivalent to:
<http auto-config="true">
<csrf disabled="false" />
...
</http>
Therefore, some changes must be made in your jsp views as well as ajax calls, as the _csrf fields must be posted back to the spring controller for the codes to work if you are using spring security 4.0.0 instead of spring security 3. Suppose that when using the security 3, I have the following form submit in my jsp view for login:
<%@ page language="java" contentType="text/html; charset=ISO-8859-1"
    pageEncoding="ISO-8859-1"%>
<html>
<head>
</head>
<body>
<form name="f" action="j_spring_security_check" method="post">
<table>
<tr><td>Username:</td>
<td>
<input type="text" value="j_username" />
</td></tr>

<tr><td>Password: </td>
<td>
<input type="password" value="j_password" />
</td></tr>

<tr><td colspan="2"><input type="submit" value="Submit" /></td></tr>
</table>
</form>
</body>
</html>
Then in spring security 4.0.0, I need to change it to:
<%@ page language="java" contentType="text/html; charset=ISO-8859-1"
    pageEncoding="ISO-8859-1"%>
<%@ taglib prefix="c" uri="http://java.sun.com/jsp/jstl/core" />
<html>
<head>
</head>
<body>
<form name="f" action="" method="post">

<input type="hidden" name="${_csrf.parameterName}" value="${_csrf.token}" />
<table>
<tr><td>Username:</td>
<td>
<input type="text" value="username" />
</td></tr>

<tr><td>Password: </td>
<td>
<input type="password" value="password" />
</td></tr>


<tr><td colspan="2"><input type="submit" value="Submit" /></td></tr>
</table>
</form>
</body>
</html>
In other words, the following changes must be made:
- "j_username" changed to "username"
- "j_password" changed to "password"
- "j_spring_security_check" changed to "<c:url value="/login" />"
- add in a line in the form for
csrf: <input type="hidden" name="${_csrf.parameterName}" value="$_csrf.token}" />
Then in each of my jsp views, if any form post action, the following hidden field must be included:
<input type="hidden" name="${_csrf.parameterName}" value="${_csrf.token}" />
Similarly, in spring security 3.2.6, i can logout using a <a> link like this:
<a href="j_spring_security_logout">Logout</a>
Now in sprig security 4.0.0, I need to do the following instead:
<form action="<c:url value="/logout" />" method="post">
<input type="submit" value="Logout" />
<input type="hidden" name="${_csrf.parameterName}" value="${_csrf.token}" />
</form>
Sunday, May 24, 2015
C# Winform: Build a R script editor using ScintillaNET
In one of my projects, I was required to create an R editor and scripting interface that communicate between winform and R script interpreter. Part of the task is to create an R editor in C# winform. After some search, I found ScintillaNET. The way to use ScintillaNET in C# winform is pretty straightforward, either download its source from github or the binary from nuget. Drag a copy of the Scintilla into the toolbox of VS IDE and drag a copy of it from toolbox to your winform UI.
To display the line number, one can set txtScript.Margins[0].Width=30
The next step is to customize ScintillaNET for R syntax highlighting, auto complete and so on. While earlier version of ScintillaNET does not have R Lexer, the current version downloaded (3.3.0) contains a very easy way for R syntax highlighting and auto-complete. Below is the Source codes (Assuming I put the code in a winform named FrmDummy, and my Scintilla editor component I put in the form is named "txtScript"):
    public partial class FrmDummy : Form
    {
 private List<string> Keywords1 = null;
        private List<string> Keywords2 = null;
        private string AutoCompleteKeywords = null;

        public FrmDummy()
        {
            InitializeComponent();

            PrepareKeywords();

            ConfigureRScriptSyntaxHighlight();
            ConfigureRScriptAutoFolding();
            ConifugreRScriptAutoComplete();

     txtScript.Text=@"#Some dummy R codes
  print('Hello World')
  x <- c('Hello World', 'Hello World2')";
        }

        private void PrepareKeywords()
        {
            Keywords1 = @"commandArgs detach length dev.off stop lm library predict lmer
            plot print display anova read.table read.csv complete.cases dim attach as.numeric seq max
            min data.frame lines curve as.integer levels nlevels ceiling sqrt ranef order
            AIC summary str head png tryCatch par mfrow interaction.plot qqnorm qqline".Split(new char[] { ' ', '\n', '\r' }, StringSplitOptions.RemoveEmptyEntries).ToList();

            Keywords2 = @"TRUE FALSE if else for while in break continue function".Split(new char[] { ' ', '\n', '\r' }, StringSplitOptions.RemoveEmptyEntries).ToList();

            List<string> keywords = Keywords1.ToList();
            keywords.AddRange(Keywords2);
            keywords.Sort();

            AutoCompleteKeywords = string.Join(" ", keywords);
        }

        private void ConfigureRScriptSyntaxHighlight()
        {

            txtScript.StyleResetDefault();
            txtScript.Styles[Style.Default].Font = "Consolas";
            txtScript.Styles[Style.Default].Size = 10;
            txtScript.StyleClearAll();

            txtScript.Styles[Style.R.Default].ForeColor = Color.Brown;
            txtScript.Styles[Style.R.Comment].ForeColor = Color.FromArgb(0, 128, 0); // Green
            txtScript.Styles[Style.R.Number].ForeColor = Color.Olive;
            txtScript.Styles[Style.R.BaseKWord].ForeColor = Color.Purple;
            txtScript.Styles[Style.R.Identifier].ForeColor = Color.Black;
            txtScript.Styles[Style.R.String].ForeColor = Color.FromArgb(163, 21, 21); // Red
            txtScript.Styles[Style.R.KWord].ForeColor = Color.Blue;
            txtScript.Styles[Style.R.OtherKWord].ForeColor = Color.Blue;
            txtScript.Styles[Style.R.String2].ForeColor = Color.OrangeRed;
            txtScript.Styles[Style.R.Operator].ForeColor = Color.Purple;


            txtScript.Lexer = Lexer.R;

            txtScript.SetKeywords(0, string.Join(" ", Keywords1));
            txtScript.SetKeywords(1, string.Join(" ", Keywords2));
        }

        private void ConifugreRScriptAutoComplete()
        {
            txtScript.CharAdded += scintilla_CharAdded;
        }

        private void scintilla_CharAdded(object sender, CharAddedEventArgs e)
        {
            Scintilla scintilla = txtScript;

            // Find the word start
            var currentPos = scintilla.CurrentPosition;
            var wordStartPos = scintilla.WordStartPosition(currentPos, true);

            // Display the autocompletion list
            var lenEntered = currentPos - wordStartPos;
            if (lenEntered > 0)
            {
                scintilla.AutoCShow(lenEntered, AutoCompleteKeywords);
            }
        }

        private void ConfigureRScriptAutoFolding()
        {
            Scintilla scintilla = txtScript;

            // Instruct the lexer to calculate folding
            scintilla.SetProperty("fold", "1");
            scintilla.SetProperty("fold.compact", "1");

            // Configure a margin to display folding symbols
            scintilla.Margins[2].Type = MarginType.Symbol;
            scintilla.Margins[2].Mask = Marker.MaskFolders;
            scintilla.Margins[2].Sensitive = true;
            scintilla.Margins[2].Width = 20;

            // Set colors for all folding markers
            for (int i = 25; i <= 31; i++)
            {
                scintilla.Markers[i].SetForeColor(SystemColors.ControlLightLight);
                scintilla.Markers[i].SetBackColor(SystemColors.ControlDark);
            }

            // Configure folding markers with respective symbols
            scintilla.Markers[Marker.Folder].Symbol = MarkerSymbol.BoxPlus;
            scintilla.Markers[Marker.FolderOpen].Symbol = MarkerSymbol.BoxMinus;
            scintilla.Markers[Marker.FolderEnd].Symbol = MarkerSymbol.BoxPlusConnected;
            scintilla.Markers[Marker.FolderMidTail].Symbol = MarkerSymbol.TCorner;
            scintilla.Markers[Marker.FolderOpenMid].Symbol = MarkerSymbol.BoxMinusConnected;
            scintilla.Markers[Marker.FolderSub].Symbol = MarkerSymbol.VLine;
            scintilla.Markers[Marker.FolderTail].Symbol = MarkerSymbol.LCorner;

            // Enable automatic folding
            scintilla.AutomaticFold = (AutomaticFold.Show | AutomaticFold.Click | AutomaticFold.Change);
        }
    }
To display the line number, one can set txtScript.Margins[0].Width=30
Sunday, May 10, 2015
Build and install grok on Ubuntu 14.04
Thanks the this post, got grok built and installed on Ubuntu 14.04:
Link: http://stackoverflow.com/questions/15287765/error-compiling-grok
Steps:
> sudo apt-get update
> sudo apt-get install -y ctags flex gperf libevent-dev libpcre3-dev libtokyocabinet-dev
> sudo apt-get install build-essential
> sudo apt-get install wget
> wget https://semicomplete.googlecode.com/files/grok-1.20110630.1.tar.gz
> tar -zxvf grok-1.20110630.1.tar.gz
> cd grok-1.20110630.1
> vi Makefile
Look for the following two lines:
Change to:
Enter the following command to build and install grok
> make
> sudo make install
Link: http://stackoverflow.com/questions/15287765/error-compiling-grok
Steps:
> sudo apt-get update
> sudo apt-get install -y ctags flex gperf libevent-dev libpcre3-dev libtokyocabinet-dev
> sudo apt-get install build-essential
> sudo apt-get install wget
> wget https://semicomplete.googlecode.com/files/grok-1.20110630.1.tar.gz
> tar -zxvf grok-1.20110630.1.tar.gz
> cd grok-1.20110630.1
> vi Makefile
Look for the following two lines:
gcc $(LDFLAGS) $^ -o $@
Change to:
gcc $^ $(LDFLAGS) -o $@
Enter the following command to build and install grok
> make
> sudo make install
Friday, May 8, 2015
Windows Environment Variable: path should not contains quotation
Recently i was puzzled by some strange behaviors in software such as boot2docker. For example, when i run a command such as:
> docker run -i -t ubuntu /bash/bin
The system will complain: no such file or directory
Today another program runs into similar type of errors, when i run
> call vcvarsall.bat x86
The system complain: "Error 2 The command "call "C:\Program Files (x86)\Microsoft Visual Studio 10.0\Common7\IDE\..\..\vc\vcvarsall.bat" x86"
The cause of error is found to be within the path variable in the windows environment variable, in which i put quotation to surround certain directories. After removing the quotation, the bug is gone.
Monday, May 4, 2015
Advices on how to successfully implement a generalized linear model in C#
Recently I was given a task in which i need to implement a GLM to be used directly in C# without the usage of R. While GLM in R is very trivial, to implement one in C# natively is not as trivial as it requires quite a bit of knowledge in linear algebra and inferential statistics. After trial and errors and going though a number of online courses teaching linear algebra and inferential statistics, I was finally able to successfully implement the required algorithms. This page documents some of the resources i went through to be able to successfully implement the algorithm, so that someone else will save their time if they were ever given such a task.
0. Quick way
If you are already familiar with linear algebra and inferential statistics, you can directly go and take a look at http://bwlewis.github.io/GLM/ and start implement your own GLM in any programming language. but if you find the terminology and symbols difficult to understand there like I used to be, then read on.
1. Learn SVD, eigen decomposition, as well as Cholesky and QR factorization
The first step is to learn the various matrix decomposition techniques, while this seems to be trivial if you are already using a matrix library such as MathNet.Numerics, you may find yourself extremely frustracted when the matrix computation performance in the library does match up to your expectation to solve linear equations in the IRLS (algorithm used in GLM) and you need to implement your own (Which is unfortunately the case for me).
Assuming you forgot most of your linear algebra knowledge learned in high school. I recommend to start with the coursera course http://czreading.blogspot.sg/2015/05/online-course-coding-matrix-linear.html. The course will teach you how to implement a sparse matrix as well as matrix factorization such as QR factorization.
While the course does not teach how to perform SVD, or Cholesky decomposition, you should find the following materials teach SVD and Cholesky very-easy to understand after taking the course:
http://czreading.blogspot.sg/2015/05/applied-numerical-computing.html
http://czreading.blogspot.sg/2015/05/numerical-methods-for-solving-large.html
With these knowledges, you should be able to implement your own linear algebra and should not have problem with the matrix computation in GLM
2. Learn inferential statistics
Another important preliminary knowledge is to understand since GLM is all about finding regression model coefficient that minimize variance-covariance of the error terms in the regression model.
GLM uses the concepts of link function and distribution family, therefore, one must be familiarized with concepts such as logit and logistic function, binomila, bernouli, normal, categorical distribution as well as linear regression and logistics regression. In addition, one must be uncomfortable with concepts such as explained variation R^2, residuals and RSS, standard error, variance-covariance matrix. If you do not have these knowledge, it is better that you go through a data analytics and inferential statistics course such as:
http://czreading.blogspot.sg/2015/04/online-course-data-analytics-and.html
To compute the derivative of link function, you may need some basic knowledge of calculus which is actually very basic.
3. Start learning about IRLS
Once you have sufficient understanding of the above topics as well as comfortable with local search algorithms, you should not have problem understand the IRLS implementation described at http://bwlewis.github.io/GLM/
With the above knowledges in linear algebra and inferential statistics, it should take you less that an afternoon to come up with the implementation of GLM as well as the IRLS and its QR and SVD Newton variants.
One trick that i learned is that the R codes given at the http://bwlewis.github.io/GLM/ is very useful for reverse engineering. For example, initially i had difficulty implements the variance(g) used as the denominator in W's diagonal entry, I just go into R and type:
binomial()$variance
And its implementation comes out, and i repeats for the rest of the distributions.
Wednesday, April 29, 2015
Interact with AWS EC2 Instance on a Ubuntu Desktop GUI
Nice post showing how to GUI remove access EC2 instance:
http://xmodulo.com/how-to-set-up-ubuntu-desktop-vm-on-amazon-ec2.html
http://xmodulo.com/how-to-set-up-ubuntu-desktop-vm-on-amazon-ec2.html
Beginner Python with Raspberry Pi Tips
Below are some tips for beginners who want to develop python program on Raspberry Pi (assuming you are using Windows as the development environment.
1. Interact with Raspberry Pi
After connect rasberry pi to your computer, you need to configure the ip address of your network adapter, to ssh login to raspberry pi (e.g. configure an address such as 10.0.2.15), use Putty which can be downloaded from http://www.putty.org/ . After launching Putty, enter the "10.0.2.15" as the address and select ssh and 22 as the port, and connect
2. Install TightVNC server for remote GUI access to Raspberry Pi
Accessing raspberry pi via putty or ssh won't allow you to launch the raspbian x11 GUI by running command such as "startx". In that case, you can use TightVNC server allows you to remote login to the Raspbian x11 GUI on the raspberry pi so that you can interact with the raspberry pi in its GUI.
>> sudo apt-get update
>> sudo apt-get install -y tightvncserver
To start and stop tightnvncserver on display 1:
>> vncserver :1
>> vncserver -kill :1
Now get a java tight vnc viewer from http://www.tightvnc.com/ and you will be able to login and view the GUI of the raspbian OS.
3. RPi.GPIO install with python
Normally for python, you will want to install the pip for easy installation of python package, this can be done by
>> sudo apt-get install python-pip
If the raspberry pi does not have the RPi.GPIO package installed, you can then run
>> pip install RPi.GPIO
The above command may failed for some errors such as "Python.h: no such a file...". The alternative is to run:
>> sudo apt-get install rpi.gpio
After this, you can start writing python codes to control raspberry pi using the RPi.GPIO package.
4. Note
Suppose you don't have a raspberry pi and just want to have a quick look of the raspbian os GUI on raspberry pi, you can download and run the emulator here:
http://sourceforge.net/projects/rpiqemuwindows/
Monday, April 27, 2015
Jenkins: Zip files into email attachment and sent by notifier in Jenkins
Sometimes during CI testing using Jenkins, when the notifier sends an email to a recipient, the recipient may not be able to click the link in the notification email to go to view the content due to user privilege and authorization limit set on the user, but sometimes it is desirable for the user to view the output the the build details such as other files generated during the build even when user is not given the right to access the Jenkins server build detail page. In this case, the solution is to zip the content of the build and directly send as an attachment to the user. Below are some brief steps to do this (assuming we are working on the projet "HelloWorld"):
1. Install ArtifactDeployer plugin to jenkins
2. Install Email-ext to jenkins
3. Configure Email-ext in the "Configurate System" of "Manage Jenkins" and "Configure" of the project "HelloWorld"
4. Add "7za a -tzip deploy.zip "%WORKSPACE%\HelloWorld\
5. Add "deploy.zip" in the files to archive as a new "Archive the artifact" post-build action in the project's "Configure"
6. Add "deploy.zip" in the attachment of the editable email notification as post-build action the project's "Configure"
7. Add send trigger for success in the editable email notification (in advanced)
If you set the smtp sever to something such as stmp.gmail.com, the email may be blocked, withe following messages in the build console output:
Error sending to the following VALID addresses: ---@----.com
SendFailedException message: 552-5.7.0 This message was blocked because its content presents a potential
This can be due to the zip attachment is not allow by that stmp settings.
Ant with JUnit: junitreport BUILDFAILED "...\junit" does not exist
I was working with JUnit and trying to build a junit report using ant's command line tool after export the ant build file on the JUnit test project in Eclipse, however, the following command line running in the test project's root directory (e.g., "D:\eclipse_jee_proj\HelloWorldTests") threw out an error:
> ant -buildfile build.xml junitreport
BUILD FAILED
D:\eclipse_jee_proj\HelloWorldTests\build.xml:137: D:\eclipse_jee_proj\HelloWorldTests\junit does not exist.
Total time: 0 seconds
The problem was easily fixed by creating a "junit" folder under the project's root directory " D:\eclipse_jee_proj\HelloWorldTests" (Note that the individual test builds must be run first, otherwise, the junitreport will generate index.html in "junit" folder indicating no test coverage).
Sunday, April 26, 2015
Jenkins: Fix errors in using MSBuild and MSTests plugin for building and test running C# project in Jenkins
Today I was trying to test run the CI of a C# project in Jenkins. To do this, i have installed the msbuild and mstest related plugins in Jenkins (MSBuild Plugin, MSTest Plugin, MSTestRunner Plugin) and restarted jenkins. However, after I added in a build step using option ''Build a Visual Studio project or solution using MSBuild'. I encountered build failure in which the console output from the build states that
The problem turns out that i did not have the msbuild in my Windows environment path. After I added in the "C:\Windows\Microsoft.NET\Framework\v4.0.30319" (which contains the command msbuild.exe) to my path, the build is successful.
Furthermore, also need to add the "C:\Program Files (x86)\Microsoft Visual Studio 11.0\Common7\IDE" (which contains mstest.exe) to the path, otherwise the MSTest plugin will throw error
Note that the above process sometimes may make mstests throw some errors such as the following:
The better way can be done via jenkins, go to jenkins and click "Manage Jenkins" and then click "Configure Systems", Add a "MSBuild" and "MSTest" version there, and then add the paths of MSBuild and MSTest in your system to the "MSBuild" and "MSTests" section there (these are added by the MSBuild and MSTest plugins), As shown in the following screenshots


Then go back to your project and set the MSBuild version and MSTest version to the ones created in the "Configure Systems", as shown in the figure below:
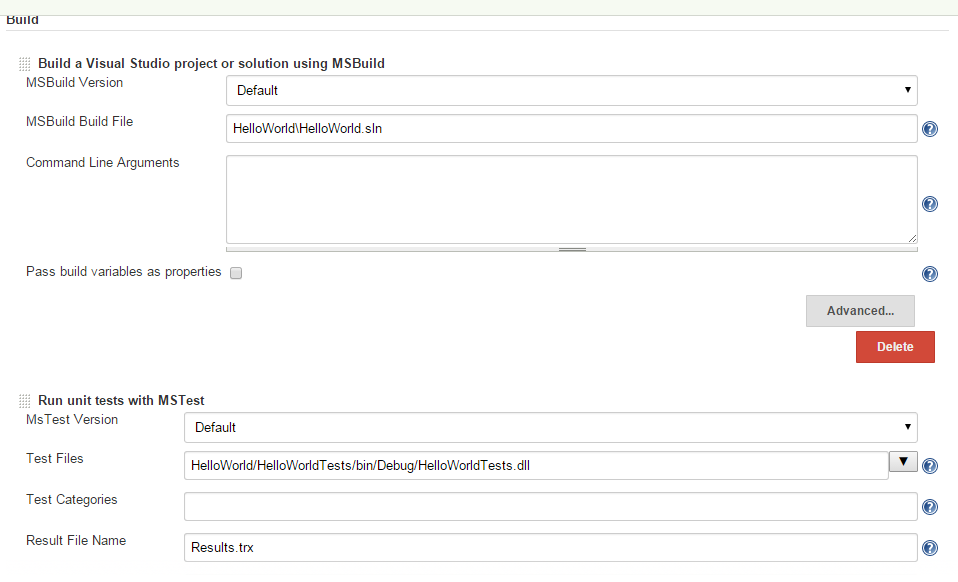
After this step, you can remove MSBuild and MSTest from your system environment path variable, and restart your jenkins, and it will work.
'msbuild.exe' is not recognized as an internal or external command
The problem turns out that i did not have the msbuild in my Windows environment path. After I added in the "C:\Windows\Microsoft.NET\Framework\v4.0.30319" (which contains the command msbuild.exe) to my path, the build is successful.
Furthermore, also need to add the "C:\Program Files (x86)\Microsoft Visual Studio 11.0\Common7\IDE" (which contains mstest.exe) to the path, otherwise the MSTest plugin will throw error
Note that the above process sometimes may make mstests throw some errors such as the following:
ERROR: Build step failed with exception
java.lang.NullPointerException
 at org.jenkinsci.plugins.MsTestBuilder.perform(MsTestBuilder.java:151)
 at hudson.tasks.BuildStepMonitor$1.perform(BuildStepMonitor.java:20)
 at hudson.model.AbstractBuild$AbstractBuildExecution.perform(AbstractBuild.java:761)
 at hudson.model.Build$BuildExecution.build(Build.java:203)
 at hudson.model.Build$BuildExecution.doRun(Build.java:160)
 at hudson.model.AbstractBuild$AbstractBuildExecution.run(AbstractBuild.java:536)
 at hudson.model.Run.execute(Run.java:1741)
 at hudson.model.FreeStyleBuild.run(FreeStyleBuild.java:43)
 at hudson.model.ResourceController.execute(ResourceController.java:98)
 at hudson.model.Executor.run(Executor.java:374)
Build step 'Run unit tests with MSTest' marked build as failure
Finished: FAILURE
The better way can be done via jenkins, go to jenkins and click "Manage Jenkins" and then click "Configure Systems", Add a "MSBuild" and "MSTest" version there, and then add the paths of MSBuild and MSTest in your system to the "MSBuild" and "MSTests" section there (these are added by the MSBuild and MSTest plugins), As shown in the following screenshots
Then go back to your project and set the MSBuild version and MSTest version to the ones created in the "Configure Systems", as shown in the figure below:
After this step, you can remove MSBuild and MSTest from your system environment path variable, and restart your jenkins, and it will work.
Setup the event log folder as a share volume to docker container using boot2docker on Windows 7
To share the event log folder with a docker container, run:
> sudo docker -i -t --name=myContainer -v /c/Windows/Sysnative/winevt/Logs:/var/winevt ubuntu:14.04 /bin/bash
The "-v" command maps the "c:Windows/System32/winevt/Logs" to "/var/winevt" in the ubuntu container as a shared volume. Note that the default path such as "C:Windows\System32\winevt\Logs" will not work, has to be specified as "/c/Windows/Sysnative/winevt/Logs"
Create timer for non-windows application in C# in which long process is run
There are times when we need to create a timer for our codes, this can be done by following some simple structure like the following:
The problem is the operation implemented in OnTimerTicked may take more than the timer interval (which is 100 milliseconds in the above example) to run. This is not desired as it may lead to memory corruption. The simple way to work around this is to fire the timer only once at the start, which will then invoke OnTimerTicked callback function, at the end of the OnTimerTicked callback, the timer can be reinvoked by calling its change() method, until flag change which cancel the timer's ticked operation. This is shown in the following code.
using System.Threading;

public class WebCrawler
{
  private Timer mTimer;

  public void Start()
  {
    mTimer = new Timer(OnTimerTicked, null, 0, 100);
  }

  public void Stop()
  {
    mTimer.Change(Timeout.Infinite, Timeout.Infinite);
  }

  private void OnTimerTicked(object state)
  {
    DoSomethingLong();
  }
}
The problem is the operation implemented in OnTimerTicked may take more than the timer interval (which is 100 milliseconds in the above example) to run. This is not desired as it may lead to memory corruption. The simple way to work around this is to fire the timer only once at the start, which will then invoke OnTimerTicked callback function, at the end of the OnTimerTicked callback, the timer can be reinvoked by calling its change() method, until flag change which cancel the timer's ticked operation. This is shown in the following code.
using System.Threading;

public class WebCrawler
{
  private Timer mTimer;
  private bool mIsWorking;

  public void Start()
  {
    mIsWorking=true;
    mTimer = new Timer(OnTimerTicked, null, 0, 100);
  }

  public void Stop()
  {
    mIsWorking = false;
    mTimer.Change(Timeout.Infinite, Timeout.Infinite);
  }

  private void OnTimerTicked(object state)
  {
    if(mIsWorking)
    {
      DoSomethingLong();
      mTimer.Change(100, Timeout.Infinite);
    }
  }
}
sh: docker: command not found
Today I was stricken by some strange behaviors when working with Docker on Windows 7. Firstly , the docker fails to initialize, either stuck at initialization or starting. This I was able to solve by manual stop the virtual box headless process in the process manager, and then restart the boot2docker.
However, subsequently, i encountered a weird message after i was able to launch and login to boot2docker. That is, whenever i tried any docker command, the message said:
sh: docker: command not found
The message in the CLI indicates the docker should be usable. I tried several methods including delete the docker vm and restart boot2docker, but to no effect. I went on goolging but there seems to be no mentioning of solution, the docker site mentions it may has something to do with docker installation being incorrect. However, the docker i am using has been running all the time without any problem until today.
The cause of the problem finally surfaced when i run the following command:
> echo $PATH
The printed out path indicates that docker and git are not found on the path, although i have added them much earlier during docker installation. Some closer examination showed that the entire path variable defined for user is not included in %PATH%.
After some investigation, it turned out that i installed the Visual SVN server and TortoiseSVN for some testing today, and their directory path are added to the system path variable during installation. this cause the system path variable to become too long. As a result, the Windows OS silently drop the user path variable, only keeping the system path variable in the %PATH%.
The solution after knowing this is simple, i uninstall some application no long in use and remove their directory from the system path variable so that my system path variable won't be too long. After this, restart the boot2docker, and the problem disappear.
Sunday, February 1, 2015
Unity: Install application into a writable folder on Windows OS with High UAC using Inno Setup
I have a Unity simulation program in which i need to create a Windows installer, I choose Inno Setup because it is free and easy to use. However, my Unity simulation program needs to writes simulation data and log data into the same folder when it is installed. Therefore the default program folder for installation is not preferred, because some users might have the UAC set to high in their Windows OS in which case the write permission in the program folder is not available.
After some thinking and a bit of search online, I found a simple way to do this. The trick it to create the installed directory in the AppData folder (one of its sub folder, e.g., Local, LocalLow, Roaming). This allows Unity simulation program installed there to write its data to the same folder even if user may have UAC set to high.
To do this with the Inno Setup. After generating the *.iss installation script in Inno Setup. Locate the line that starts with "DefaultDirName=". Now change it to "DefaultDirName={localappdata}\{#MyAppName}", Then build the installer. and the default installation path will be from the AppData/Local folder on the user's computer.
Wednesday, January 28, 2015
Unity: Tips for optimizing performance for C#
This post discusses some tips on how to optimize performance in C# Unity programming:
1. Uses foreach() as infrequent as possible. foreach(...) is bad in Unity programming, the foreach(...) loop generates 24 bytes of garbage memory. If you are using a array or list object in C#, then you can use for loop to replace foreach loop. If you are using other collection classes such Dictionary and HashSet, then uses GetEnumerator() from the collection object and while loop to replace it.
2. Uses DateTime.UtcNow to replaces DateTime.Now for tasks such as tracking elapsed time and so on. DateTime.Now consumes more computational resources than DateTime.UtcNow.
3. Overrides OnBecomeInvisible() of the MonoBehavior class to implements logics that hide and stop some proccessing of the game object whenever it becomes invisible (Note that the game object should have a Renderer component for this method handler to be invoked during runtime).
4. Create and Destroy object using Instantiate and Destroy during runtime can be expensive and slow down the frame rate. Apart from putting these operation in StartCoroutine, one workaround is creating a set of game objects at the beginning of the game and store them in a collection such as a Queue. Then instead of calling Instantiate during the game play, call the Dequeue() on the Queue to return a copy of the already created game object and invokes its SetActive(true) method. And instead of calling Destroy, call the Enqueue() on the Queue to store the game object back to the queue (Remember to call the game object's SetActive(false)). This can be a performance hit
5. For a very large generic list of objects in stored in a collection, performance will be gained when a number of collections is used to store the objects (each of them store one of its property, for example). In my personal experience, I used to have List<Employee> collection object in Unity game, where the number of Employee stored in the list is close to 9 millions. Trying to add or remove Employee object from this List<Employee> collection becomes extremely slow. In the end, what I did was to designed a generic collection class, CustomizedList, resembling List<Employee>. The Employee class can be something like the following:
class Employee
{
public int Age;
public int YearsOfExperience;
public float Salary;
public string Occupation;
public string ID;
public Employee()
{
ID = Guid.NewGuid();
}
public override int GetHashCode()
{
return ID.GetHashCode();
}
public override bool Equals(Object rhs)
{
if(rhs is Employee)
{
Employee rhs1=rhs as Employee;
return ID=rhs1.ID;
}
return false;
}
}
and my generic class looks something like this (Note that this is a demo class):
class CustomizedList
{
public List<int> Age = new List<int>();
public List<int> YearsOfExperience = new List<int>();
public List<float> Salary = new List<float>();
public List<string> Occupation = new List<string>();
public List<string> ID= new List<string>();
public void Add(Employee e)
{
Age.Add(e.Age);
YearsOfExperience.Add(e.YearsOfExperience);
Salary.Add(e.Salary);
Occupation.Add(e.Occupation);
ID.Add(e.ID);
}
public Employee this[int index]
{
Employee e=new Employee();
e.ID = ID[index];
e.Age=Age[index];
e.Salary =Salary[index];
e.Occupation=Occupation[index];
e.YearsOfExperience=YearsOfExperience[index];
return e;
}
public void RemoveAt(int index)
{
Age.RemoveAt(index);
ID.RemoveAt(index);
Salary.RemoveAt(index);
Occupation.RemoveAt(index);
YearsOfExperience.RemoveAt(index);
}
public int IndexOf(Employee e)
{
return ID.IndexOf(e.ID);
}
public void Remove(Employee e)
{
int index = IndexOf(e);
RemoveAt(index);
}
public int Count
{
get
{
return ID.Count;
}
}
public Employee Iterate()
{
for(int i=0; i < Count; ++i)
{
yield return this[i];
}
}
}
The basic concept is very simple decomposes the Employee objects into its properties, each of which is stored in a separate list when Add(Employee e) method is called. However, CustomizedList has tremendous increase in performance when compare to the usage of List<Employee> when the number of items stored is extremely large. Of course when processing such a large collection, StartCoroutine is required as a time slice method for long processing (please refers to http://czcodezone.blogspot.com/2015/01/unity-use-startcoroutine-to-perform.html).
Tuesday, January 27, 2015
Install D-Link DWM-221 Broadband Modem on Ubuntu LTS 14.04 64 Bit
This post shows how to connect to Internet using a D-Link broadband modem dongle (Model DWM-221) on the Ubuntu LTS 14.04 64 Bit OS. Most of the posts i searched online on this topic does not seem to work (most of them on DWM-156 and older versions of Ubuntu), therefore i decides to write something about how to do it after successfully get it to work on my Ubuntu OS.
Firstly, one may need to install the ia32-libs, the following command lines can be followed to install ia32-libs on Ubuntu 14.04:
Once the D-Link folder has been mounted, you will notice there is a zip file in the folder named "DTLW3_D600B_linux_2.0.0WW_140305.tar.gz". If you try to extract it to a folder on your computer, you may encounter "Cannot create hard links ..." error messages. To get around list, right-click the file and select "Open with Archive Manager", extracts all the files excepts the hard links "device.conf" (which has size 0). Now in the extracted folder, you should have something like the following files and folders:
install.sh
uninstall.sh
linux
/usr
/bin
/etc
/3g_modem_connection
/ppp
/cm.version
/device.conf
To make it easier, i have share the contents in the extracted folder here:
https://dl.dropboxusercontent.com/u/113201788/Hardware/D-Link%20Modem/DWM-221.tar.gz
In the extracted folder, run the following command:
sudo bash install.sh
Once this is done, go to the networking icons on the upper right corner of the Ubuntu desktop and select "Create new mobile broadband", follow the simple steps (basically a wizard asking several simple questions such as your internet provider and data plan in the form of drop down lists) and you should be able to connect to the internet via your D-Link broadband modem (Can try "sudo 3g_connect.sh ttyUSB0" if still got problem).
Firstly, one may need to install the ia32-libs, the following command lines can be followed to install ia32-libs on Ubuntu 14.04:
sudo apt-get install libc6:i386
sudo -i
cd /etc/apt/sources.list.d
echo "deb http://old-releases.ubuntu.com/ubuntu/ raring main restricted universe multiverse" >ia32-libs-raring.list
apt-get update
apt-get install ia32-libs
rm /etc/apt/sources.list.d/ia32-libs-raring.list
apt-get update
exit
sudo apt-get install gcc-multilibsudo -su mkdir /media/cdrom mount /dev/sr1 /media/cdromYou may try "mount /dev/sr0 /media/cdrom" if "mount /dev/sr0 /media/cdrom" does not work.
Once the D-Link folder has been mounted, you will notice there is a zip file in the folder named "DTLW3_D600B_linux_2.0.0WW_140305.tar.gz". If you try to extract it to a folder on your computer, you may encounter "Cannot create hard links ..." error messages. To get around list, right-click the file and select "Open with Archive Manager", extracts all the files excepts the hard links "device.conf" (which has size 0). Now in the extracted folder, you should have something like the following files and folders:
install.sh
uninstall.sh
linux
/usr
/bin
/etc
/3g_modem_connection
/ppp
/cm.version
/device.conf
To make it easier, i have share the contents in the extracted folder here:
https://dl.dropboxusercontent.com/u/113201788/Hardware/D-Link%20Modem/DWM-221.tar.gz
In the extracted folder, run the following command:
sudo bash install.sh
Once this is done, go to the networking icons on the upper right corner of the Ubuntu desktop and select "Create new mobile broadband", follow the simple steps (basically a wizard asking several simple questions such as your internet provider and data plan in the form of drop down lists) and you should be able to connect to the internet via your D-Link broadband modem (Can try "sudo 3g_connect.sh ttyUSB0" if still got problem).
Thursday, January 22, 2015
Unity: Use PersistentDictionary and ESENT to store large collection object in Unity
This post shows how to add ESENT to Unity game and how to use PersistentDictionary in ESENT to store a very large collection of objects in Unity game.
Firstly, we need to download ESENT and make it available to Unity game development, double-click any C# script in the Unity project panel to bring up the Visual Studio, right-click the project in the Visual Studio and select "Managed NuGet Packages...". In the "Manage NuGet Packages ...", key in "ESENT" to search for the Extensible Storage Engine, and click the "Install" button for the first result (which is "ManagedEsent 1.6" in my case) coming up. This will install the ESENT references for development in Visual Studio.
Next we need to make ESENT libraries available to Unity. To this end, create a new folder under "Assets" in the Unity project panel (e.g., name it "References"). Now go to the "Packages\ManagedEsent.1.6\lib\net20" folder in your Unity project folder, and drag the "Esent.Collections.dll" and "Esent.Interop.dll" into the "References" folder in the Unity project folder. Upon this, Unity will now recognize the ESENT library and you can use it in C#. Below is a C# code snippet which shows how to uses a PersistentDictionary object from ESENT to store a large number of objects.
As PersistentDictionary is quite peculiar about the key type and the value type, in this particular case, each of the Employee object is given a id which is a string and serves as the key for the PersistentDictionary as it has a IComparable interface already. the Employee object itself is serialize into a string to be store (the serialization can be a JSON string, e.g.), the Enumerator function allows each Employee object in the collection to be iterated.
One thing to note is the CreatePersistentDictionary method, the method is implemented such that whenever a collection is created with an existing mID, the old data stores in the database with that mID as name will be wiped out. This is intended to let user starts with an empty database when clear is called (all when the constructor is called).
Firstly, we need to download ESENT and make it available to Unity game development, double-click any C# script in the Unity project panel to bring up the Visual Studio, right-click the project in the Visual Studio and select "Managed NuGet Packages...". In the "Manage NuGet Packages ...", key in "ESENT" to search for the Extensible Storage Engine, and click the "Install" button for the first result (which is "ManagedEsent 1.6" in my case) coming up. This will install the ESENT references for development in Visual Studio.
Next we need to make ESENT libraries available to Unity. To this end, create a new folder under "Assets" in the Unity project panel (e.g., name it "References"). Now go to the "Packages\ManagedEsent.1.6\lib\net20" folder in your Unity project folder, and drag the "Esent.Collections.dll" and "Esent.Interop.dll" into the "References" folder in the Unity project folder. Upon this, Unity will now recognize the ESENT library and you can use it in C#. Below is a C# code snippet which shows how to uses a PersistentDictionary object from ESENT to store a large number of objects.
using Microsoft.Isam.Esent.Collections.Generic;
using UnityEngine;

public class Employee
{
 public string ID;
 public override string ToString()
 {
  return ID;
 }
 public static Employee ParseEmployee(string serializedContent)
 {
  Employee person = new Employee();
  person.ID = serializedContent;
  return person;
 }
}
public class EmployeePool
{
 private string mID;
 protected PersistentDictionary<string, string> mData = null;

 public EmployeePool(string id)
 {
  mID = id;

 }

 public void Add(Employee person)
 {
  if (mData == null)
  {
   CreatePersistentDictionary<string, string>(ref mData, mID);
  }
  mData[person.ID] = person.ToString();
 }

 public void Clear()
 {
  CreatePersistentDictionary<string, string>(ref mData, mID);
 }

 private static void CreatePersistentDictionary<T, V>(ref PersistentDictionary<T, V> current, string directory)
    where T : IComparable<T>
 {
  string full_directory_path = Path.Combine(Application.persistentDataPath, directory);

  if (PersistentDictionaryFile.Exists(full_directory_path))
  {
   PersistentDictionaryFile.DeleteFiles(full_directory_path);
  }

  current = new PersistentDictionary<T, V>(full_directory_path);
 }

 private static void DeletePersistentDictionary<T, V>(ref PersistentDictionary<T, V> current, string directory)
  where T: IComparable<T>
 {
  string full_directory_path = Path.Combine(Application.persistentDataPath, directory);

  if (PersistentDictionaryFile.Exists(full_directory_path))
  {
   PersistentDictionaryFile.DeleteFiles(full_directory_path);
  }
  current=null;
 }

 public int Count
 {
  get
  {
   if (mData == null)
   {
    return 0;
   }
   return mData.Count;
  }
 }

 public void Remove(Employee e)
 {
  mData.Remove(e.ID);
 }

 public Employee this[string index]
 {
  get
  {
   if (mData.ContainsKey(index))
   {
    return Employee.ParseEmployee(mData[index]);
   }
   return null;
  }
 }

 public IEnumerable<Employee> Enumerator
 {
  get
  {
   foreach (string key in mData.Keys)
   {
    yield return this[key];
   }
  }
 }
}
As PersistentDictionary is quite peculiar about the key type and the value type, in this particular case, each of the Employee object is given a id which is a string and serves as the key for the PersistentDictionary as it has a IComparable interface already. the Employee object itself is serialize into a string to be store (the serialization can be a JSON string, e.g.), the Enumerator function allows each Employee object in the collection to be iterated.
One thing to note is the CreatePersistentDictionary method, the method is implemented such that whenever a collection is created with an existing mID, the old data stores in the database with that mID as name will be wiped out. This is intended to let user starts with an empty database when clear is called (all when the constructor is called).
Wednesday, January 21, 2015
Unity: Use StartCoroutine to perform long time processing
This post shows how to use StartCoroutine to perform long time processing. Below is a simple basic code for calling long processing function (which i named LongProcessingFunction()) in a C# script attached to game object in a scene.
void Update()
{
  int iterationCount1 = 10000000;
  int iterationCount2 = 10000;
  StartCoroutine(LongProcessingFunction(iterationCount1, iterationCount2));
}

private IEnumerator LongProcessingFunction(int count1, int count2)
{
  yield return new WaitForEndOfFrame();
  for(int i = 0; i < count1; ++i)
  {
     for(int j=0; j < count2; ++j)
  {
     Debug.Log("processing ... "+i+" and "+j);
  }
  }
}
If you run the above code, your game will probably hang or suspend for a while during which you cannot click and interact with anything in your game scene. This makes one wonder why the coroutine prevents the running of the game. The important point to note, though, is that calling StartCoroutine(LongProcessingFunction()) does not really start a new thread or a parallel task, as in .NET. By calling StartCoroutine on LongProcessingFunction(), as soon as the "yield return new WaitForEndOfFrame()" line in the LongProcessingFunction, the unity game engine resumes temporally jump out of the LongProcessingFunction() execution, and runs a few frames before resumes the execution of the LongProcessingFunction() from the point it left off earlier. The execution will continue until the next time the "yield return ..." is encountered again in the LongProcessingFunction.
What this means is the execution of LongProcessingFunction is on the same thread as the calling function Update(). Therefore, as long as "yield return ..." is not encountered, the execution will continue on the LongProcessingFunction() until it is completed, then unity game engine resume the execution of frames again. Unfortunately, this means that during the time in which LongProcessingFunction is processing, the graphics of the game becomes unresponsive, which is what causes the "hanging" of the game.
Below is the code I designed to get around this problem, not elegant, but it gets the job done for me.
My idea is very simple, the code in LongProcessingFunction uses "currentTimeTick" and "intervalTimeTick" to keep track the amount has been elapsed since the last time "yield return null" is called, when the elapsed time is around 50 milliseconds, the "yield return null" is called, which trigger the unity game engine to temporarily leaves the LongProcessingFunction and go to process one frame and then return to the point it left off in the LongProcessingFunction (The "yield return null" basically tolds the unity game engine to come back to LongProcessingFunction after one frame execution). In this way, the game graphics will have a frame rate of roughly 20 frames per seconds, which is bearable, since one wants to spend as much time in the LongProcessingFunction as possible, so that is can be completed asap. The three variables "isInLongProcessing", "mLoop1" and "mLoop2" can be used to display processing progress. and signal the Update() whether it is still doing long processing (I uses A key press to trigger the long processing, just for demo purpose).
What this means is the execution of LongProcessingFunction is on the same thread as the calling function Update(). Therefore, as long as "yield return ..." is not encountered, the execution will continue on the LongProcessingFunction() until it is completed, then unity game engine resume the execution of frames again. Unfortunately, this means that during the time in which LongProcessingFunction is processing, the graphics of the game becomes unresponsive, which is what causes the "hanging" of the game.
Below is the code I designed to get around this problem, not elegant, but it gets the job done for me.
private bool isInLongProcessing;
private int mLoop1;
private int mLoop2;

void Start()
{
  isInLongProcessing = false;
}

void Update()
{
  int iterationCount1 = 10000000;
  int iterationCount2 = 10000;
  if(isInLongProcessing)
  {
    //do something here during long processing time
    return;
  }
  else
  {
   if(Input.GetKey(KeyCode.A))
   {
  StartCoroutine(LongProcessingFunction(iterationCount1, iterationCount2));
   }
   else
   {
      //do something here during normal time
   }
  }
}

void OnGUI()
{
  if(isInLongProcessing)
  {
    string message = string.Format("Long Processing: {0} {1}", mLoop1, mLoop2);
    GUI.Label(new Rect(0, 0, Screen.width, 20), message);
  }
}

private IEnumerator LongProcessingFunction(int count1, int count2)
{
  yield return new WaitForEndOfFrame();
  isInLongProcessing = true;
  DateTime currentTimeTick = DateTime.Now;
  DateTime intervalTimeTick = currentTimeTick;
  for(mLoop1 = 0; mLoop1 < count1; ++mLoop1)
  {
     for(int mLoop2=0; mLoop2 < count2; ++mLoop2)
  {
  currentTimeTick = DateTime.Now;
  TimeSpan ts = currentTimeTick - intervalTimeTick;
  if(ts.TotalMilliseconds >= 50)
  {
    intervalTimeTick = currentTimeTick;
    yield return null;
  }
  }
  }
  isInLongProcessing = false;
}
My idea is very simple, the code in LongProcessingFunction uses "currentTimeTick" and "intervalTimeTick" to keep track the amount has been elapsed since the last time "yield return null" is called, when the elapsed time is around 50 milliseconds, the "yield return null" is called, which trigger the unity game engine to temporarily leaves the LongProcessingFunction and go to process one frame and then return to the point it left off in the LongProcessingFunction (The "yield return null" basically tolds the unity game engine to come back to LongProcessingFunction after one frame execution). In this way, the game graphics will have a frame rate of roughly 20 frames per seconds, which is bearable, since one wants to spend as much time in the LongProcessingFunction as possible, so that is can be completed asap. The three variables "isInLongProcessing", "mLoop1" and "mLoop2" can be used to display processing progress. and signal the Update() whether it is still doing long processing (I uses A key press to trigger the long processing, just for demo purpose).
Unity: Prevent 3D Text from always appearing on top
The default shader used by 3D Text make it always appear on top, which is not desirable, for example, when the 3D text attached to a game character go behind a wall or build, the text will still be showing. There is already a well-explained tutorial (see the link below) that shows how to incorporate a shader for 3D text to get around this issue:
http://wiki.unity3d.com/index.php?title=3DText
The problem is for a newbie like me, I had a difficult time to figure out how to generate a font texture for the font material mentioned in that tutorial, on which to apply the shader. Therefore, this tutorial documents on how i managed to find the solution. Firstly, go to unity asset store:
https://www.assetstore.unity3d.com/
Key in "font" in the search box, download and import a free font asset from the asset store into your project, for example, the following one will do:
https://www.assetstore.unity3d.com/en/#!/content/4235
After the font asset has been imported, select the font asset folder under "Assets" in the project panel, and select the font you would like to generate the font texture and material. In the inspector panel, change the "Character" field from dynamic to Unicode, click the gear button at the upper-right of the inspector panel and select "Create Editable Copy", as shown in the figure below:

This will generate the font texture and font material at the same time, as shown in the figure below:

Remember to change the "shader" property of the font material in the inspector panel to "GUI/3D Text", Now you can change the font material and font in the 3D text component to match with the font material and font you just created. Below is the result of applying the shader in a project i am working on:

http://wiki.unity3d.com/index.php?title=3DText
The problem is for a newbie like me, I had a difficult time to figure out how to generate a font texture for the font material mentioned in that tutorial, on which to apply the shader. Therefore, this tutorial documents on how i managed to find the solution. Firstly, go to unity asset store:
https://www.assetstore.unity3d.com/
Key in "font" in the search box, download and import a free font asset from the asset store into your project, for example, the following one will do:
https://www.assetstore.unity3d.com/en/#!/content/4235
After the font asset has been imported, select the font asset folder under "Assets" in the project panel, and select the font you would like to generate the font texture and material. In the inspector panel, change the "Character" field from dynamic to Unicode, click the gear button at the upper-right of the inspector panel and select "Create Editable Copy", as shown in the figure below:
This will generate the font texture and font material at the same time, as shown in the figure below:
Remember to change the "shader" property of the font material in the inspector panel to "GUI/3D Text", Now you can change the font material and font in the 3D text component to match with the font material and font you just created. Below is the result of applying the shader in a project i am working on:
Tuesday, January 20, 2015
Unity: Load a file in the build resources folder
In unity, we may want to allow user to have access to the content of a particular file which they can modify and incorporate back into the game. The simple way is to let user create it (or let the game program to create it during the runtime) in the "Resources" folder under the data folder of the game build, which can then be loaded subsequently in the game. However, we may also want to provides user with a default version at the beginning so that they can modify based on the original version. This can be simply solved by having the original version of the file stored in a created folder name "Resources" under the Assets folder in the game development project. When the game is built, the contents in this "Resources" folder will be packaged into the game. When the game start, we can have a script to check whether a version of the file already exists in the "Resources" folder under the data folder of the game build, if not, the default version can be loaded from the game package and saved into that folder. Subsequently the user can then modify the file directly and have it loaded in the game. Below shows a demo script for this concept (in this case, the particular file is ReadMe.txt)
void Start()
{
 string dirPath = Path.Combine(Application.dataPath, "Resources");
 string filepath = Path.Combine(dirPath, "ReadMe.txt");

 if (!File.Exists(filepath))
 {
  TextAsset ta = (TextAsset)Resources.Load("ReadMe");
  using (StreamWriter writer = new StreamWriter(filepath))
  {
   writer.WriteLine(ta.text);
  }
 }

 if (File.Exists(filepath))
 {
  using (StreamReader reader = new StreamReader(filepath))
  {
   mReadMeText = reader.ReadToEnd();
  }
 }
}
Subscribe to:
Posts (Atom)