Wednesday, June 28, 2017

Decision Forest in Java

java-decision-forest


Package implements decision tree and ensemble methods
Build Status Coverage Status

Features

  • ID3 Decision Tree with both numerical and categorical inputs
  • Isolation Forest for Anomaly Detection
  • Tree Ensembles such as Bagging and Adaboost

Install

Add the following dependency to your POM file:
<dependency>
  <groupId>com.github.chen0040</groupId>
  <artifactId>java-decision-forest</artifactId>
  <version>1.0.3</version>
</dependency>

Usage

Classification

To create and train a ID3 classifier:
ID3 classifier = new ID3();
clasifier.fit(trainingData);
The "trainingData" is a data frame which holds data rows with labeled output (Please refers to this link to find out how to store data into a data frame)
To predict using the trained ARTMAP classifier:
String predicted_label = classifier.transform(dataRow);
The detail on how to use this can be found in the unit testing codes. Below is a complete sample codes of classifying on the libsvm-formatted heart-scale data:
InputStream inputStream = new FileInputStream("heart_scale");
DataFrame dataFrame = DataQuery.libsvm().from(inputStream).build();

// as the dataFrame obtained thus far has numeric output instead of labeled categorical output, the code below performs the categorical output conversion
dataFrame.unlock();
for(int i=0; i < dataFrame.rowCount(); ++i){
 DataRow row = dataFrame.row(i);
 row.setCategoricalTargetCell("category-label", "" + row.target());
}
dataFrame.lock();

ID3 classifier = new ID3();
classifier.fit(dataFrame);

for(int i = 0; i < dataFrame.rowCount(); ++i){
  DataRow tuple = dataFrame.row(i);
  String predicted_label = classifier.transform(tuple);
  System.out.println("predicted: "+predicted_label+"\tactual: "+tuple.categoricalTarget());
}

Classification via Ensemble (Bagging)

To create and train a Bagging ensemble classifier:
Bagging classifier = new Bagging();
clasifier.fit(trainingData);
The "trainingData" is a data frame which holds data rows with labeled output (Please refers to this link to find out how to store data into a data frame)
To predict using the trained ARTMAP classifier:
String predicted_label = classifier.transform(dataRow);
The detail on how to use this can be found in the unit testing codes. Below is a complete sample codes of classifying on the libsvm-formatted heart-scale data:
InputStream inputStream = new FileInputStream("heart_scale");
DataFrame dataFrame = DataQuery.libsvm().from(inputStream).build();

// as the dataFrame obtained thus far has numeric output instead of labeled categorical output, the code below performs the categorical output conversion
dataFrame.unlock();
for(int i=0; i < dataFrame.rowCount(); ++i){
 DataRow row = dataFrame.row(i);
 row.setCategoricalTargetCell("category-label", "" + row.target());
}
dataFrame.lock();

Bagging classifier = new Bagging();
classifier.fit(dataFrame);

for(int i = 0; i < dataFrame.rowCount(); ++i){
  DataRow tuple = dataFrame.row(i);
  String predicted_label = classifier.transform(tuple);
  System.out.println("predicted: "+predicted_label+"\tactual: "+tuple.categoricalTarget());
}

Classification via Ensemble (AdaBoost)

InputStream irisStream = new FileInputStream("iris.data");
DataFrame irisData = DataQuery.csv(",")
      .from(irisStream)
      .selectColumn(0).asNumeric().asInput("Sepal Length")
      .selectColumn(1).asNumeric().asInput("Sepal Width")
      .selectColumn(2).asNumeric().asInput("Petal Length")
      .selectColumn(3).asNumeric().asInput("Petal Width")
      .selectColumn(4).asCategory().asOutput("Iris Type")
      .build();

TupleTwo<DataFrame, DataFrame> parts = irisData.shuffle().split(0.9);

DataFrame trainingData = parts._1();
DataFrame crossValidationData = parts._2();

System.out.println(crossValidationData.head(10));

MultiClassAdaBoost multiClassClassifier = new MultiClassAdaBoost();
multiClassClassifier.fit(trainingData);

ClassifierEvaluator evaluator = new ClassifierEvaluator();

for(int i=0; i < crossValidationData.rowCount(); ++i) {
 String predicted = multiClassClassifier.classify(crossValidationData.row(i));
 String actual = crossValidationData.row(i).categoricalTarget();
 System.out.println("predicted: " + predicted + "\tactual: " + actual);
 evaluator.evaluate(actual, predicted);
}

evaluator.report();

Classification via Ensemble (SAMME)

InputStream irisStream = new FileInputStream("iris.data");
DataFrame irisData = DataQuery.csv(",")
      .from(irisStream)
      .selectColumn(0).asNumeric().asInput("Sepal Length")
      .selectColumn(1).asNumeric().asInput("Sepal Width")
      .selectColumn(2).asNumeric().asInput("Petal Length")
      .selectColumn(3).asNumeric().asInput("Petal Width")
      .selectColumn(4).asCategory().asOutput("Iris Type")
      .build();

TupleTwo<DataFrame, DataFrame> parts = irisData.shuffle().split(0.9);

DataFrame trainingData = parts._1();
DataFrame crossValidationData = parts._2();

System.out.println(crossValidationData.head(10));

SAMME multiClassClassifier = new SAMME();
multiClassClassifier.fit(trainingData);

ClassifierEvaluator evaluator = new ClassifierEvaluator();

for(int i=0; i < crossValidationData.rowCount(); ++i) {
 String predicted = multiClassClassifier.classify(crossValidationData.row(i));
 String actual = crossValidationData.row(i).categoricalTarget();
 System.out.println("predicted: " + predicted + "\tactual: " + actual);
 evaluator.evaluate(actual, predicted);
}

evaluator.report();
To create and train a Bagging ensemble classifier:

Anomaly Detection

The problem that we will be using as demo is the following anomaly detection problem:
scki-learn example for one-class
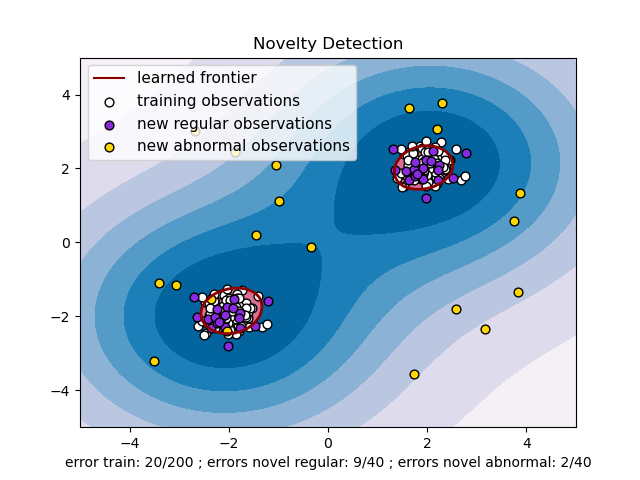
Below is the sample code which illustrates how to use Isolation Forest to detect outliers in the above problem:
DataQuery.DataFrameQueryBuilder schema = DataQuery.blank()
      .newInput("c1")
      .newInput("c2")
      .newOutput("anomaly")
      .end();

Sampler.DataSampleBuilder negativeSampler = new Sampler()
      .forColumn("c1").generate((name, index) -> randn() * 0.3 + (index % 2 == 0 ? -2 : 2))
      .forColumn("c2").generate((name, index) -> randn() * 0.3 + (index % 2 == 0 ? -2 : 2))
      .forColumn("anomaly").generate((name, index) -> 0.0)
      .end();

Sampler.DataSampleBuilder positiveSampler = new Sampler()
      .forColumn("c1").generate((name, index) -> rand(-4, 4))
      .forColumn("c2").generate((name, index) -> rand(-4, 4))
      .forColumn("anomaly").generate((name, index) -> 1.0)
      .end();

DataFrame data = schema.build();

data = negativeSampler.sample(data, 20);
data = positiveSampler.sample(data, 20);

System.out.println(data.head(10));

IsolationForest method = new IsolationForest();
method.setThreshold(0.38);
DataFrame learnedData = method.fitAndTransform(data);

BinaryClassifierEvaluator evaluator = new BinaryClassifierEvaluator();

for(int i = 0; i < learnedData.rowCount(); ++i){
 boolean predicted = learnedData.row(i).categoricalTarget().equals("1");
 boolean actual = data.row(i).target() == 1.0;
 evaluator.evaluate(actual, predicted);
 logger.info("predicted: {}\texpected: {}", predicted, actual);
}

logger.info("summary: {}", evaluator.getSummary());

Clustering Algorithms in Java

java-clustering


Package provides java implementation of various clustering algorithms
Build Status Coverage Status

Features

  • Hierarchical Clustering
  • KMeans Clustering
  • DBSCAN
  • Single Linkage Clustering

Install

Add the following dependency to your POM file:
<dependency>
  <groupId>com.github.chen0040</groupId>
  <artifactId>java-clustering</artifactId>
  <version>1.0.3</version>
</dependency>

Spatial Segmentation using Hierarchical Clustering

The following sample code shows how to use hierarchical clustering to separate two clusters:
DataQuery.DataFrameQueryBuilder schema = DataQuery.blank()
      .newInput("c1")
      .newInput("c2")
      .newOutput("designed")
      .end();

Sampler.DataSampleBuilder negativeSampler = new Sampler()
      .forColumn("c1").generate((name, index) -> randn() * 0.3 + (index % 2 == 0 ? 2 : 4))
      .forColumn("c2").generate((name, index) -> randn() * 0.3 + (index % 2 == 0 ? 2 : 4))
      .forColumn("designed").generate((name, index) -> 0.0)
      .end();

Sampler.DataSampleBuilder positiveSampler = new Sampler()
      .forColumn("c1").generate((name, index) -> rand(-4, -2))
      .forColumn("c2").generate((name, index) -> rand(-2, -4))
      .forColumn("designed").generate((name, index) -> 1.0)
      .end();

DataFrame data = schema.build();

data = negativeSampler.sample(data, 50);
data = positiveSampler.sample(data, 50);

System.out.println(data.head(10));

HierarchicalClustering algorithm = new HierarchicalClustering();
algorithm.setLinkage(linkageCriterion);
algorithm.setClusterCount(2);

DataFrame learnedData = algorithm.fitAndTransform(data);

for(int i = 0; i < learnedData.rowCount(); ++i){
 DataRow tuple = learnedData.row(i);
 String clusterId = tuple.getCategoricalTargetCell("cluster");
 System.out.println("learned: " + clusterId +"\tknown: "+tuple.target());
}

Spatial Segmentation using EM Clustering

The following sample code shows how to use EM clustering to separate two clusters:
DataQuery.DataFrameQueryBuilder schema = DataQuery.blank()
      .newInput("c1")
      .newInput("c2")
      .newOutput("designed")
      .end();

Sampler.DataSampleBuilder negativeSampler = new Sampler()
      .forColumn("c1").generate((name, index) -> randn() * 0.3 + (index % 2 == 0 ? 2 : 4))
      .forColumn("c2").generate((name, index) -> randn() * 0.3 + (index % 2 == 0 ? 2 : 4))
      .forColumn("designed").generate((name, index) -> 0.0)
      .end();

Sampler.DataSampleBuilder positiveSampler = new Sampler()
      .forColumn("c1").generate((name, index) -> rand(-4, -2))
      .forColumn("c2").generate((name, index) -> rand(-2, -4))
      .forColumn("designed").generate((name, index) -> 1.0)
      .end();

DataFrame data = schema.build();

data = negativeSampler.sample(data, 50);
data = positiveSampler.sample(data, 50);

System.out.println(data.head(10));

EMClustering algorithm = new EMClustering();
algorithm.setSigma0(1.5);
algorithm.setClusterCount(2);

DataFrame learnedData = algorithm.fitAndTransform(data);

for(int i = 0; i < learnedData.rowCount(); ++i){
 DataRow tuple = learnedData.row(i);
 String clusterId = tuple.getCategoricalTargetCell("cluster");
 System.out.println("learned: " + clusterId +"\tknown: "+tuple.target());
}

Spatial Segmentation using Single Linkage Clustering

The following sample code shows how to use single linkage clustering to separate two clusters:
DataQuery.DataFrameQueryBuilder schema = DataQuery.blank()
      .newInput("c1")
      .newInput("c2")
      .newOutput("designed")
      .end();

Sampler.DataSampleBuilder negativeSampler = new Sampler()
      .forColumn("c1").generate((name, index) -> randn() * 0.3 + (index % 2 == 0 ? 2 : 4))
      .forColumn("c2").generate((name, index) -> randn() * 0.3 + (index % 2 == 0 ? 2 : 4))
      .forColumn("designed").generate((name, index) -> 0.0)
      .end();

Sampler.DataSampleBuilder positiveSampler = new Sampler()
      .forColumn("c1").generate((name, index) -> rand(-4, -2))
      .forColumn("c2").generate((name, index) -> rand(-2, -4))
      .forColumn("designed").generate((name, index) -> 1.0)
      .end();

DataFrame data = schema.build();

data = negativeSampler.sample(data, 50);
data = positiveSampler.sample(data, 50);

System.out.println(data.head(10));

SingleLinkageClustering algorithm = new SingleLinkageClustering();
algorithm.setClusterCount(2);

DataFrame learnedData = algorithm.fitAndTransform(data);

for(int i = 0; i < learnedData.rowCount(); ++i){
 DataRow tuple = learnedData.row(i);
 String clusterId = tuple.getCategoricalTargetCell("cluster");
 System.out.println("learned: " + clusterId +"\tknown: "+tuple.target());
}

Spatial Segmentation using DBSCAN

The following sample code shows how to use DBSCAN to perform clustering:
DataQuery.DataFrameQueryBuilder schema = DataQuery.blank()
      .newInput("c1")
      .newInput("c2")
      .newOutput("designed")
      .end();

Sampler.DataSampleBuilder negativeSampler = new Sampler()
      .forColumn("c1").generate((name, index) -> randn() * 0.3 + (index % 2 == 0 ? 2 : 4))
      .forColumn("c2").generate((name, index) -> randn() * 0.3 + (index % 2 == 0 ? 2 : 4))
      .forColumn("designed").generate((name, index) -> 0.0)
      .end();

Sampler.DataSampleBuilder positiveSampler = new Sampler()
      .forColumn("c1").generate((name, index) -> rand(-4, -2))
      .forColumn("c2").generate((name, index) -> rand(-2, -4))
      .forColumn("designed").generate((name, index) -> 1.0)
      .end();

DataFrame data = schema.build();

data = negativeSampler.sample(data, 200);
data = positiveSampler.sample(data, 200);

System.out.println(data.head(10));

DBSCAN algorithm = new DBSCAN();
algorithm.setEpsilon(0.5);

DataFrame learnedData = algorithm.fitAndTransform(data);

for(int i = 0; i < learnedData.rowCount(); ++i){
 DataRow tuple = learnedData.row(i);
 String clusterId = tuple.getCategoricalTargetCell("cluster");
 System.out.println("learned: " + clusterId +"\tknown: "+tuple.target());
}

Image Segmentation (Clustering) using KMeans

The following sample code shows how to use FuzzyART to perform image segmentation:
BufferedImage img= ImageIO.read(FileUtils.getResource("1.jpg"));

DataFrame dataFrame = ImageDataFrameFactory.dataFrame(img);

KMeans cluster = new KMeans();
DataFrame learnedData = cluster.fitAndTransform(dataFrame);

for(int i=0; i <learnedData.rowCount(); ++i) {
 ImageDataRow row = (ImageDataRow)learnedData.row(i);
 int x = row.getPixelX();
 int y = row.getPixelY();
 String clusterId = row.getCategoricalTargetCell("cluster");
 System.out.println("cluster id for pixel (" + x + "," + y + ") is " + clusterId);
}
The segmented image can be generated using the trained KMeans from above as illustrated by the following sample code:
List<Integer> classColors = new ArrayList<Integer>();
for(int i=0; i < 5; ++i){
 for(int j=0; j < 5; ++j){
    classColors.add(ImageDataFrameFactory.get_rgb(255, rand.nextInt(255), rand.nextInt(255), rand.nextInt(255)));
 }
}

BufferedImage segmented_image = new BufferedImage(img.getWidth(), img.getHeight(), img.getType());
for(int x=0; x < img.getWidth(); x++)
{
 for(int y=0; y < img.getHeight(); y++)
 {
    int rgb = img.getRGB(x, y);

    DataRow tuple = ImageDataFrameFactory.getPixelTuple(x, y, rgb);

    int clusterIndex = cluster.transform(tuple);

    rgb = classColors.get(clusterIndex % classColors.size());

    segmented_image.setRGB(x, y, rgb);
 }
}