Nice post showing how to GUI remove access EC2 instance:
http://xmodulo.com/how-to-set-up-ubuntu-desktop-vm-on-amazon-ec2.html
Wednesday, April 29, 2015
Beginner Python with Raspberry Pi Tips
Below are some tips for beginners who want to develop python program on Raspberry Pi (assuming you are using Windows as the development environment.
1. Interact with Raspberry Pi
After connect rasberry pi to your computer, you need to configure the ip address of your network adapter, to ssh login to raspberry pi (e.g. configure an address such as 10.0.2.15), use Putty which can be downloaded from http://www.putty.org/ . After launching Putty, enter the "10.0.2.15" as the address and select ssh and 22 as the port, and connect
2. Install TightVNC server for remote GUI access to Raspberry Pi
Accessing raspberry pi via putty or ssh won't allow you to launch the raspbian x11 GUI by running command such as "startx". In that case, you can use TightVNC server allows you to remote login to the Raspbian x11 GUI on the raspberry pi so that you can interact with the raspberry pi in its GUI.
>> sudo apt-get update
>> sudo apt-get install -y tightvncserver
To start and stop tightnvncserver on display 1:
>> vncserver :1
>> vncserver -kill :1
Now get a java tight vnc viewer from http://www.tightvnc.com/ and you will be able to login and view the GUI of the raspbian OS.
3. RPi.GPIO install with python
Normally for python, you will want to install the pip for easy installation of python package, this can be done by
>> sudo apt-get install python-pip
If the raspberry pi does not have the RPi.GPIO package installed, you can then run
>> pip install RPi.GPIO
The above command may failed for some errors such as "Python.h: no such a file...". The alternative is to run:
>> sudo apt-get install rpi.gpio
After this, you can start writing python codes to control raspberry pi using the RPi.GPIO package.
4. Note
Suppose you don't have a raspberry pi and just want to have a quick look of the raspbian os GUI on raspberry pi, you can download and run the emulator here:
http://sourceforge.net/projects/rpiqemuwindows/
Monday, April 27, 2015
Jenkins: Zip files into email attachment and sent by notifier in Jenkins
Sometimes during CI testing using Jenkins, when the notifier sends an email to a recipient, the recipient may not be able to click the link in the notification email to go to view the content due to user privilege and authorization limit set on the user, but sometimes it is desirable for the user to view the output the the build details such as other files generated during the build even when user is not given the right to access the Jenkins server build detail page. In this case, the solution is to zip the content of the build and directly send as an attachment to the user. Below are some brief steps to do this (assuming we are working on the projet "HelloWorld"):
1. Install ArtifactDeployer plugin to jenkins
2. Install Email-ext to jenkins
3. Configure Email-ext in the "Configurate System" of "Manage Jenkins" and "Configure" of the project "HelloWorld"
4. Add "7za a -tzip deploy.zip "%WORKSPACE%\HelloWorld\
5. Add "deploy.zip" in the files to archive as a new "Archive the artifact" post-build action in the project's "Configure"
6. Add "deploy.zip" in the attachment of the editable email notification as post-build action the project's "Configure"
7. Add send trigger for success in the editable email notification (in advanced)
If you set the smtp sever to something such as stmp.gmail.com, the email may be blocked, withe following messages in the build console output:
Error sending to the following VALID addresses: ---@----.com
SendFailedException message: 552-5.7.0 This message was blocked because its content presents a potential
This can be due to the zip attachment is not allow by that stmp settings.
Ant with JUnit: junitreport BUILDFAILED "...\junit" does not exist
I was working with JUnit and trying to build a junit report using ant's command line tool after export the ant build file on the JUnit test project in Eclipse, however, the following command line running in the test project's root directory (e.g., "D:\eclipse_jee_proj\HelloWorldTests") threw out an error:
> ant -buildfile build.xml junitreport
BUILD FAILED
D:\eclipse_jee_proj\HelloWorldTests\build.xml:137: D:\eclipse_jee_proj\HelloWorldTests\junit does not exist.
Total time: 0 seconds
The problem was easily fixed by creating a "junit" folder under the project's root directory " D:\eclipse_jee_proj\HelloWorldTests" (Note that the individual test builds must be run first, otherwise, the junitreport will generate index.html in "junit" folder indicating no test coverage).
Sunday, April 26, 2015
Jenkins: Fix errors in using MSBuild and MSTests plugin for building and test running C# project in Jenkins
Today I was trying to test run the CI of a C# project in Jenkins. To do this, i have installed the msbuild and mstest related plugins in Jenkins (MSBuild Plugin, MSTest Plugin, MSTestRunner Plugin) and restarted jenkins. However, after I added in a build step using option ''Build a Visual Studio project or solution using MSBuild'. I encountered build failure in which the console output from the build states that
The problem turns out that i did not have the msbuild in my Windows environment path. After I added in the "C:\Windows\Microsoft.NET\Framework\v4.0.30319" (which contains the command msbuild.exe) to my path, the build is successful.
Furthermore, also need to add the "C:\Program Files (x86)\Microsoft Visual Studio 11.0\Common7\IDE" (which contains mstest.exe) to the path, otherwise the MSTest plugin will throw error
Note that the above process sometimes may make mstests throw some errors such as the following:
The better way can be done via jenkins, go to jenkins and click "Manage Jenkins" and then click "Configure Systems", Add a "MSBuild" and "MSTest" version there, and then add the paths of MSBuild and MSTest in your system to the "MSBuild" and "MSTests" section there (these are added by the MSBuild and MSTest plugins), As shown in the following screenshots


Then go back to your project and set the MSBuild version and MSTest version to the ones created in the "Configure Systems", as shown in the figure below:
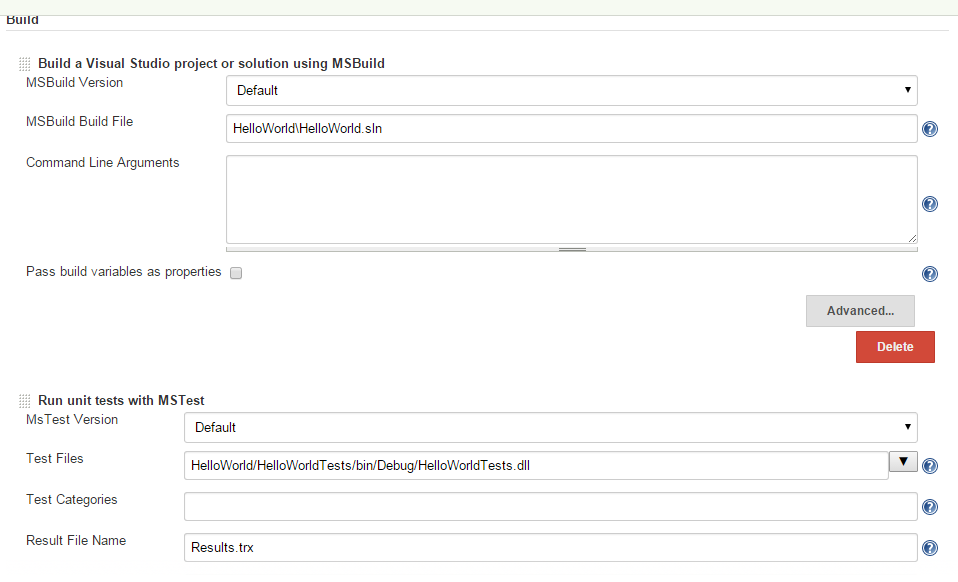
After this step, you can remove MSBuild and MSTest from your system environment path variable, and restart your jenkins, and it will work.
'msbuild.exe' is not recognized as an internal or external command
The problem turns out that i did not have the msbuild in my Windows environment path. After I added in the "C:\Windows\Microsoft.NET\Framework\v4.0.30319" (which contains the command msbuild.exe) to my path, the build is successful.
Furthermore, also need to add the "C:\Program Files (x86)\Microsoft Visual Studio 11.0\Common7\IDE" (which contains mstest.exe) to the path, otherwise the MSTest plugin will throw error
Note that the above process sometimes may make mstests throw some errors such as the following:
ERROR: Build step failed with exception
java.lang.NullPointerException
 at org.jenkinsci.plugins.MsTestBuilder.perform(MsTestBuilder.java:151)
 at hudson.tasks.BuildStepMonitor$1.perform(BuildStepMonitor.java:20)
 at hudson.model.AbstractBuild$AbstractBuildExecution.perform(AbstractBuild.java:761)
 at hudson.model.Build$BuildExecution.build(Build.java:203)
 at hudson.model.Build$BuildExecution.doRun(Build.java:160)
 at hudson.model.AbstractBuild$AbstractBuildExecution.run(AbstractBuild.java:536)
 at hudson.model.Run.execute(Run.java:1741)
 at hudson.model.FreeStyleBuild.run(FreeStyleBuild.java:43)
 at hudson.model.ResourceController.execute(ResourceController.java:98)
 at hudson.model.Executor.run(Executor.java:374)
Build step 'Run unit tests with MSTest' marked build as failure
Finished: FAILURE
The better way can be done via jenkins, go to jenkins and click "Manage Jenkins" and then click "Configure Systems", Add a "MSBuild" and "MSTest" version there, and then add the paths of MSBuild and MSTest in your system to the "MSBuild" and "MSTests" section there (these are added by the MSBuild and MSTest plugins), As shown in the following screenshots
Then go back to your project and set the MSBuild version and MSTest version to the ones created in the "Configure Systems", as shown in the figure below:
After this step, you can remove MSBuild and MSTest from your system environment path variable, and restart your jenkins, and it will work.
Setup the event log folder as a share volume to docker container using boot2docker on Windows 7
To share the event log folder with a docker container, run:
> sudo docker -i -t --name=myContainer -v /c/Windows/Sysnative/winevt/Logs:/var/winevt ubuntu:14.04 /bin/bash
The "-v" command maps the "c:Windows/System32/winevt/Logs" to "/var/winevt" in the ubuntu container as a shared volume. Note that the default path such as "C:Windows\System32\winevt\Logs" will not work, has to be specified as "/c/Windows/Sysnative/winevt/Logs"
Create timer for non-windows application in C# in which long process is run
There are times when we need to create a timer for our codes, this can be done by following some simple structure like the following:
The problem is the operation implemented in OnTimerTicked may take more than the timer interval (which is 100 milliseconds in the above example) to run. This is not desired as it may lead to memory corruption. The simple way to work around this is to fire the timer only once at the start, which will then invoke OnTimerTicked callback function, at the end of the OnTimerTicked callback, the timer can be reinvoked by calling its change() method, until flag change which cancel the timer's ticked operation. This is shown in the following code.
using System.Threading;

public class WebCrawler
{
  private Timer mTimer;

  public void Start()
  {
    mTimer = new Timer(OnTimerTicked, null, 0, 100);
  }

  public void Stop()
  {
    mTimer.Change(Timeout.Infinite, Timeout.Infinite);
  }

  private void OnTimerTicked(object state)
  {
    DoSomethingLong();
  }
}
The problem is the operation implemented in OnTimerTicked may take more than the timer interval (which is 100 milliseconds in the above example) to run. This is not desired as it may lead to memory corruption. The simple way to work around this is to fire the timer only once at the start, which will then invoke OnTimerTicked callback function, at the end of the OnTimerTicked callback, the timer can be reinvoked by calling its change() method, until flag change which cancel the timer's ticked operation. This is shown in the following code.
using System.Threading;

public class WebCrawler
{
  private Timer mTimer;
  private bool mIsWorking;

  public void Start()
  {
    mIsWorking=true;
    mTimer = new Timer(OnTimerTicked, null, 0, 100);
  }

  public void Stop()
  {
    mIsWorking = false;
    mTimer.Change(Timeout.Infinite, Timeout.Infinite);
  }

  private void OnTimerTicked(object state)
  {
    if(mIsWorking)
    {
      DoSomethingLong();
      mTimer.Change(100, Timeout.Infinite);
    }
  }
}
sh: docker: command not found
Today I was stricken by some strange behaviors when working with Docker on Windows 7. Firstly , the docker fails to initialize, either stuck at initialization or starting. This I was able to solve by manual stop the virtual box headless process in the process manager, and then restart the boot2docker.
However, subsequently, i encountered a weird message after i was able to launch and login to boot2docker. That is, whenever i tried any docker command, the message said:
sh: docker: command not found
The message in the CLI indicates the docker should be usable. I tried several methods including delete the docker vm and restart boot2docker, but to no effect. I went on goolging but there seems to be no mentioning of solution, the docker site mentions it may has something to do with docker installation being incorrect. However, the docker i am using has been running all the time without any problem until today.
The cause of the problem finally surfaced when i run the following command:
> echo $PATH
The printed out path indicates that docker and git are not found on the path, although i have added them much earlier during docker installation. Some closer examination showed that the entire path variable defined for user is not included in %PATH%.
After some investigation, it turned out that i installed the Visual SVN server and TortoiseSVN for some testing today, and their directory path are added to the system path variable during installation. this cause the system path variable to become too long. As a result, the Windows OS silently drop the user path variable, only keeping the system path variable in the %PATH%.
The solution after knowing this is simple, i uninstall some application no long in use and remove their directory from the system path variable so that my system path variable won't be too long. After this, restart the boot2docker, and the problem disappear.
Subscribe to:
Posts (Atom)