Showing posts with label C#. Show all posts

Wednesday, June 28, 2017

C# codes for working with powerpoint

cs-vsto-powerpoint-writer


Package provides VSTO-based C# implementation of a powerpoint modifier

Objective

The project is to create a simple library which uses VSTO to automate powerpoint modification by using C# DSL syntax.

Langauage

C#

Install

The library was built using VS2015 Community Edition. You can clone and build the library then add the library to your references in a .NET project. Note that this library is based on VSTO and thus requires the availability of office 2007 for it to work. It also requires the following COM libraries to be available in the C# project's references
  • Microsoft.Office.Core (Version: 2.4)
  • Microsoft.Office.Interop.Excel (Version: 1.6)
  • Microsoft.Office.Interop.Powerpoint (Version: 2.9)
This link below shows how to solve the COM error when uninstall vs 2007 and reinstall some other version of office and then reinstall vs 2007:

Usage

Below is the C# sample code for modifying the input.ppt and producing the output.ppt:
PowerPointReportModifier builder = new PowerPointReportModifier();
builder.ChartIntercepted += (sender, e) =>
{
 string title = e.Title;
 PowerPoint.Chart chart = e.Chart;
 Worksheet sheet = e.Worksheet;

 // code to modify the chart here
};
builder.TableIntercepted += (sender, e) =>
{
 PowerPoint.Table table = e.Table;

 // code to modify the table here
};
builder.TextFrameIntercepted += (sender, e) =>
{
 PowerPoint.TextRange paragraph = e.Paragraph;
 
 // code to modify the paragraph here
};

builder.Apply("input.ppt", "output.ppt");

C# codes for creating large word document

cs-vsto-large-doc-writer

Package provides a large report generator using on word docs using VSTO and C#

Objective

While there have been quite a number of libraries which claims to be able to generate word document report. However, many of these libraries failed when it came to generate a very large report, one that may contains hundreds of pages or even more. This library was created to enable report generation in word document in these circumstances.

Langauage

C#

Install

The library was built using VS2015 Community Edition. You can clone and build the library then add the library to your references in a .NET project. Note that this library is based on VSTO and thus requires the availability of office 2007 for it to work. It also requires the following COM libraries to be available in the C# project's references
  • Microsoft.Office.Core (Version: 2.4)
  • Microsoft.Office.Interop.Excel (Version: 1.6)
  • Microsoft.Office.Interop.Word (Version: 8.4)
This link below shows how to solve the COM error when uninstall vs 2007 and reinstall some other version of office and then reinstall vs 2007:

Usage

Below is the C# sample code for creating a sample report:
using LargeDocWriter;

ReportModel report = new ReportModel();
report.StartSection_H1("Section One");

report.AppendParagraph("Hello this is some text");

report.StartSection_H2("Paragraph Illustration");

report.AppendParagraph("Hello this is second paragraph");

report.AppendParagraph("Hello this is third paragraph");

//report.AppendFigure("some_picture.jpg", "Some figure", 500, 300);

report.StartSection_H2("Table Illustration");

report.AppendParagraph("This section shows how to create table.");

DataTable table = new DataTable();
table.Columns.Add("Column1");
table.Columns.Add("Column2");

DataRow row = table.NewRow();
row["Column1"] = 200;
row["Column2"] = 500;
table.Rows.Add(row);

report.AppendTable(table, "Some table");

report.StartSection_H2("Chart Illustration");

report.AppendParagraph("This section shows how to create charts.");

Dictionary<string, float> barData = new Dictionary<string, float>();
barData["one"] = 200;
barData["two"] = 500;
barData["three"] = 300;

report.AppendBarChart(barData, "Some sample data", 500, 300);

report.AppendColumnChart(barData, "Some column bar", 500, 300);

report.AppendPieChart(barData, "some pie chart", 400, 400);

report.StartSection_H1("Conclusion");

report.AppendParagraph("Some conclusion");


ReportGeneratorWithVSTO generator = new ReportGeneratorWithVSTO(report);

string imageContentFolder = "/tmp";
generator.GenerateReport("/tmp/hello.doc", imageContentFolder);

Thursday, May 25, 2017

Open Source: C# implementation of a simple expert system shell

cs-expert-system-shell

C# implementation of an expert system shell, targeting .Net Core 1.1
Build Status

Install

Run the following command to install:
Install-Package cs-expert-system-shell

Usage

The sample code below shows how to create a rule engine and initialize it with a set of rules:
using chen0040.ExpertSystem;
public RuleInferenceEngine getInferenceEngine()
{
 RuleInferenceEngine rie = new RuleInferenceEngine();

 Rule rule = new Rule("Bicycle");
 rule.AddAntecedent(new IsClause("vehicleType", "cycle"));
 rule.AddAntecedent(new IsClause("num_wheels", "2"));
 rule.AddAntecedent(new IsClause("motor", "no"));
 rule.setConsequent(new IsClause("vehicle", "Bicycle"));
 rie.AddRule(rule);

 rule = new Rule("Tricycle");
 rule.AddAntecedent(new IsClause("vehicleType", "cycle"));
 rule.AddAntecedent(new IsClause("num_wheels", "3"));
 rule.AddAntecedent(new IsClause("motor", "no"));
 rule.setConsequent(new IsClause("vehicle", "Tricycle"));
 rie.AddRule(rule);

 rule = new Rule("Motorcycle");
 rule.AddAntecedent(new IsClause("vehicleType", "cycle"));
 rule.AddAntecedent(new IsClause("num_wheels", "2"));
 rule.AddAntecedent(new IsClause("motor", "yes"));
 rule.setConsequent(new IsClause("vehicle", "Motorcycle"));
 rie.AddRule(rule);

 rule = new Rule("SportsCar");
 rule.AddAntecedent(new IsClause("vehicleType", "automobile"));
 rule.AddAntecedent(new IsClause("size", "medium"));
 rule.AddAntecedent(new IsClause("num_doors", "2"));
 rule.setConsequent(new IsClause("vehicle", "Sports_Car"));
 rie.AddRule(rule);

 rule = new Rule("Sedan");
 rule.AddAntecedent(new IsClause("vehicleType", "automobile"));
 rule.AddAntecedent(new IsClause("size", "medium"));
 rule.AddAntecedent(new IsClause("num_doors", "4"));
 rule.setConsequent(new IsClause("vehicle", "Sedan"));
 rie.AddRule(rule);

 rule = new Rule("MiniVan");
 rule.AddAntecedent(new IsClause("vehicleType", "automobile"));
 rule.AddAntecedent(new IsClause("size", "medium"));
 rule.AddAntecedent(new IsClause("num_doors", "3"));
 rule.setConsequent(new IsClause("vehicle", "MiniVan"));
 rie.AddRule(rule);

 rule = new Rule("SUV");
 rule.AddAntecedent(new IsClause("vehicleType", "automobile"));
 rule.AddAntecedent(new IsClause("size", "large"));
 rule.AddAntecedent(new IsClause("num_doors", "4"));
 rule.setConsequent(new IsClause("vehicle", "SUV"));
 rie.AddRule(rule);

 rule = new Rule("Cycle");
 rule.AddAntecedent(new LessClause("num_wheels", "4"));
 rule.setConsequent(new IsClause("vehicleType", "cycle"));
 rie.AddRule(rule);

 rule = new Rule("Automobile");
 rule.AddAntecedent(new IsClause("num_wheels", "4"));
 rule.AddAntecedent(new IsClause("motor", "yes"));
 rule.setConsequent(new IsClause("vehicleType", "automobile"));
 rie.AddRule(rule);

 return rie;
}
The sample code below shows how to use forward chaining in the rule engine to derive more facts from the known facts using rules:
RuleInferenceEngine rie = getInferenceEngine();
rie.AddFact(new IsClause("num_wheels", "4"));
rie.AddFact(new IsClause("motor", "yes"));
rie.AddFact(new IsClause("num_doors", "3"));
rie.AddFact(new IsClause("size", "medium"));

console.WriteLine("before inference");
console.WriteLine("{0}", rie.Facts);
console.WriteLine("");

rie.Infer(); //forward chain

console.WriteLine("after inference");
console.WriteLine("{0}", rie.Facts);
console.WriteLine("");
The sample code below shows how to use the backward chaining to reach conclusion for a target variable given a set of known facts:
RuleInferenceEngine rie = getInferenceEngine();
rie.AddFact(new IsClause("num_wheels", "4"));
rie.AddFact(new IsClause("motor", "yes"));
rie.AddFact(new IsClause("num_doors", "3"));
rie.AddFact(new IsClause("size", "medium"));

console.WriteLine("Infer: vehicle");

List<Clause> unproved_conditions = new List<Clause>();

Clause conclusion = rie.Infer("vehicle", unproved_conditions);

console.WriteLine("Conclusion: " + conclusion);

Assert.Equal(conclusion.Value, "MiniVan");
The sample code below shows how to use the rule engine to ask more questions when it fails to reach conclusion for the target variable given a limited set of known facts:
RuleInferenceEngine rie = getInferenceEngine();

console.WriteLine("Infer with All Facts Cleared:");
rie.ClearFacts();

List<Clause> unproved_conditions = new List<Clause>();

Clause conclusion = null;
while (conclusion == null)
{
 conclusion = rie.Infer("vehicle", unproved_conditions);
 if (conclusion == null)
 {
  if (unproved_conditions.Count == 0)
  {
   break;
  }
  Clause c = unproved_conditions[0];
  console.WriteLine("ask: " + c + "?");
  unproved_conditions.Clear();
  console.WriteLine("What is " + c.Variable + "?");
  String value = Console.ReadLine();
  rie.AddFact(new IsClause(c.Variable, value));
 }
}

console.WriteLine("Conclusion: " + conclusion);
console.WriteLine("Memory: ");
console.WriteLine("{0}", rie.Facts);

Tuesday, October 13, 2015

Redis: Running redis server in docker container and access it from Windows host

Start the boot2docker on Windows host, run the following commands to create a container instance:

> docker run -i -t -p 6379:6379 --name=redis ubuntu bash

Note that the "-p 6379:6379" expose the port 6379 (which is the port on which redis server run by default) of the docker container as the port of the docker vm, so that it can be accessed from the Windows host. In the "redis" container, run the following command to install the necessary tools for building redis:

> sudo apt-get update
> sudo apt-get upgrade
> sudo apt-get install build-essential
> sudo apt-get install tk8.5 tcl8.5
> sudo apt-get install wget

In the "redis" container, run the following command to download and build the redis

> cd /opt
> wget http://download.redis.io/redis-stable.tar.gz
> tar xvzf redis-stable.tar.gz
> cd redis-stable
> make distclean
> make test

In the "redis" container, run the following command to start running the redis server:
> cd /opt/redis-stable/src
> ./redis-server

Open a console windows on the Windows host and type the following command to find out the boot2docker ip address:

> boot2docker ip

which should return something like 192.168.59.103  (Note that the address 192.169.59.103 is the ip address of the docker vm, which by default the docker container is mapped to)

Now start a redis client from the Windows console windows (if you have not downloaded the redis client binary, can download it from https://github.com/ServiceStack/redis-windows) by entering the following command line in the console of the Windows host:

> cd [your-redis-windows-binary-directory]
> redis-cli.exe -h 192.168.59.103

That's it. This is the link to some C# demo code (using the ServiceStack.Redis library via nuget) which connect to the redis server running in the docker container:

https://dl.dropboxusercontent.com/u/113201788/Redis/RedisDemoCSharp.zip


Sunday, May 24, 2015

C# Winform: Build a R script editor using ScintillaNET

In one of my projects, I was required to create an R editor and scripting interface that communicate between winform and R script interpreter. Part of the task is to create an R editor in C# winform. After some search, I found ScintillaNET. The way to use ScintillaNET in C# winform is pretty straightforward, either download its source from github or the binary from nuget. Drag a copy of the Scintilla into the toolbox of VS IDE and drag a copy of it from toolbox to your winform UI.

The next step is to customize ScintillaNET for R syntax highlighting, auto complete and so on. While earlier version of ScintillaNET does not have R Lexer, the current version downloaded (3.3.0) contains a very easy way for R syntax highlighting and auto-complete. Below is the Source codes (Assuming I put the code in a winform named FrmDummy, and my Scintilla editor component I put in the form is named "txtScript"):


    public partial class FrmDummy : Form
    {
 private List<string> Keywords1 = null;
        private List<string> Keywords2 = null;
        private string AutoCompleteKeywords = null;
        
        public FrmDummy()
        {
            InitializeComponent();

            PrepareKeywords();

            ConfigureRScriptSyntaxHighlight();
            ConfigureRScriptAutoFolding();
            ConifugreRScriptAutoComplete();
   
     txtScript.Text=@"#Some dummy R codes
  print('Hello World')
  x <- c('Hello World', 'Hello World2')";
        }
  
        private void PrepareKeywords()
        {
            Keywords1 = @"commandArgs detach length dev.off stop lm library predict lmer 
            plot print display anova read.table read.csv complete.cases dim attach as.numeric seq max 
            min data.frame lines curve as.integer levels nlevels ceiling sqrt ranef order
            AIC summary str head png tryCatch par mfrow interaction.plot qqnorm qqline".Split(new char[] { ' ', '\n', '\r' }, StringSplitOptions.RemoveEmptyEntries).ToList();

            Keywords2 = @"TRUE FALSE if else for while in break continue function".Split(new char[] { ' ', '\n', '\r' }, StringSplitOptions.RemoveEmptyEntries).ToList();

            List<string> keywords = Keywords1.ToList();
            keywords.AddRange(Keywords2);
            keywords.Sort();

            AutoCompleteKeywords = string.Join(" ", keywords);
        }

        private void ConfigureRScriptSyntaxHighlight()
        {

            txtScript.StyleResetDefault();
            txtScript.Styles[Style.Default].Font = "Consolas";
            txtScript.Styles[Style.Default].Size = 10;
            txtScript.StyleClearAll();

            txtScript.Styles[Style.R.Default].ForeColor = Color.Brown;
            txtScript.Styles[Style.R.Comment].ForeColor = Color.FromArgb(0, 128, 0); // Green
            txtScript.Styles[Style.R.Number].ForeColor = Color.Olive;
            txtScript.Styles[Style.R.BaseKWord].ForeColor = Color.Purple;
            txtScript.Styles[Style.R.Identifier].ForeColor = Color.Black;
            txtScript.Styles[Style.R.String].ForeColor = Color.FromArgb(163, 21, 21); // Red
            txtScript.Styles[Style.R.KWord].ForeColor = Color.Blue;
            txtScript.Styles[Style.R.OtherKWord].ForeColor = Color.Blue;
            txtScript.Styles[Style.R.String2].ForeColor = Color.OrangeRed;
            txtScript.Styles[Style.R.Operator].ForeColor = Color.Purple;


            txtScript.Lexer = Lexer.R;

            txtScript.SetKeywords(0, string.Join(" ", Keywords1));
            txtScript.SetKeywords(1, string.Join(" ", Keywords2));
        }

        private void ConifugreRScriptAutoComplete()
        {
            txtScript.CharAdded += scintilla_CharAdded;
        }

        private void scintilla_CharAdded(object sender, CharAddedEventArgs e)
        {
            Scintilla scintilla = txtScript;

            // Find the word start
            var currentPos = scintilla.CurrentPosition;
            var wordStartPos = scintilla.WordStartPosition(currentPos, true);

            // Display the autocompletion list
            var lenEntered = currentPos - wordStartPos;
            if (lenEntered > 0)
            {
                scintilla.AutoCShow(lenEntered, AutoCompleteKeywords);
            }
        }

        private void ConfigureRScriptAutoFolding()
        {
            Scintilla scintilla = txtScript;

            // Instruct the lexer to calculate folding
            scintilla.SetProperty("fold", "1");
            scintilla.SetProperty("fold.compact", "1");

            // Configure a margin to display folding symbols
            scintilla.Margins[2].Type = MarginType.Symbol;
            scintilla.Margins[2].Mask = Marker.MaskFolders;
            scintilla.Margins[2].Sensitive = true;
            scintilla.Margins[2].Width = 20;

            // Set colors for all folding markers
            for (int i = 25; i <= 31; i++)
            {
                scintilla.Markers[i].SetForeColor(SystemColors.ControlLightLight);
                scintilla.Markers[i].SetBackColor(SystemColors.ControlDark);
            }

            // Configure folding markers with respective symbols
            scintilla.Markers[Marker.Folder].Symbol = MarkerSymbol.BoxPlus;
            scintilla.Markers[Marker.FolderOpen].Symbol = MarkerSymbol.BoxMinus;
            scintilla.Markers[Marker.FolderEnd].Symbol = MarkerSymbol.BoxPlusConnected;
            scintilla.Markers[Marker.FolderMidTail].Symbol = MarkerSymbol.TCorner;
            scintilla.Markers[Marker.FolderOpenMid].Symbol = MarkerSymbol.BoxMinusConnected;
            scintilla.Markers[Marker.FolderSub].Symbol = MarkerSymbol.VLine;
            scintilla.Markers[Marker.FolderTail].Symbol = MarkerSymbol.LCorner;

            // Enable automatic folding
            scintilla.AutomaticFold = (AutomaticFold.Show | AutomaticFold.Click | AutomaticFold.Change);
        }
    }

To display the line number, one can set txtScript.Margins[0].Width=30

Sunday, April 26, 2015

Jenkins: Fix errors in using MSBuild and MSTests plugin for building and test running C# project in Jenkins

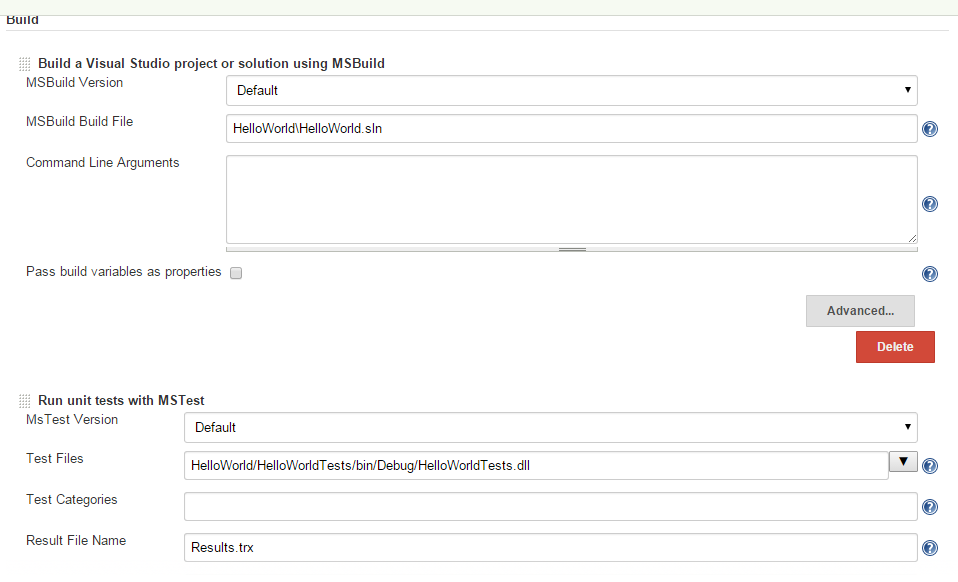
Today I was trying to test run the CI of a C# project in Jenkins. To do this, i have installed the msbuild and mstest related plugins in Jenkins (MSBuild Plugin, MSTest Plugin, MSTestRunner Plugin) and restarted jenkins. However, after I added in a build step using option ''Build a Visual Studio project or solution using MSBuild'. I encountered build failure in which the console output from the build states that

'msbuild.exe' is not recognized as an internal or external command

The problem turns out that i did not have the msbuild in my Windows environment path. After I added in the "C:\Windows\Microsoft.NET\Framework\v4.0.30319" (which contains the command msbuild.exe) to my path, the build is successful.

Furthermore, also need to add the "C:\Program Files (x86)\Microsoft Visual Studio 11.0\Common7\IDE" (which contains mstest.exe) to the path, otherwise the MSTest plugin will throw error


Note that the above process sometimes may make mstests throw some errors such as the following:

ERROR: Build step failed with exception
java.lang.NullPointerException
 at org.jenkinsci.plugins.MsTestBuilder.perform(MsTestBuilder.java:151)
 at hudson.tasks.BuildStepMonitor$1.perform(BuildStepMonitor.java:20)
 at hudson.model.AbstractBuild$AbstractBuildExecution.perform(AbstractBuild.java:761)
 at hudson.model.Build$BuildExecution.build(Build.java:203)
 at hudson.model.Build$BuildExecution.doRun(Build.java:160)
 at hudson.model.AbstractBuild$AbstractBuildExecution.run(AbstractBuild.java:536)
 at hudson.model.Run.execute(Run.java:1741)
 at hudson.model.FreeStyleBuild.run(FreeStyleBuild.java:43)
 at hudson.model.ResourceController.execute(ResourceController.java:98)
 at hudson.model.Executor.run(Executor.java:374)
Build step 'Run unit tests with MSTest' marked build as failure
Finished: FAILURE

The better way can be done via jenkins, go to jenkins and click "Manage Jenkins" and then click "Configure Systems", Add a "MSBuild" and "MSTest" version there, and then add the paths of MSBuild and MSTest in your system to the "MSBuild" and "MSTests" section there (these are added by the MSBuild and MSTest plugins), As shown in the following screenshots


Then go back to your project and set the MSBuild version and MSTest version to the ones created in the "Configure Systems", as shown in the figure below:


After this step, you can remove MSBuild and MSTest from your system environment path variable, and restart your jenkins, and it will work.

Create timer for non-windows application in C# in which long process is run

There are times when we need to create a timer for our codes, this can be done by following some simple structure like the following:

using System.Threading;

public class WebCrawler
{
  private Timer mTimer;
  
  public void Start()
  {
    mTimer = new Timer(OnTimerTicked, null, 0, 100);
  }

  public void Stop()
  {
    mTimer.Change(Timeout.Infinite, Timeout.Infinite);
  }

  private void OnTimerTicked(object state)
  {
    DoSomethingLong();
  }
}


The problem is the operation implemented in OnTimerTicked may take more than the timer interval (which is 100 milliseconds in the above example) to run. This is not desired as it may lead to memory corruption. The simple way to work around this is to fire the timer only once at the start, which will then invoke OnTimerTicked callback function, at the end of the OnTimerTicked callback, the timer can be reinvoked by calling its change() method, until flag change which cancel the timer's ticked operation. This is shown in the following code.

using System.Threading;

public class WebCrawler
{
  private Timer mTimer;
  private bool mIsWorking;
  
  public void Start()
  {
    mIsWorking=true;
    mTimer = new Timer(OnTimerTicked, null, 0, 100);
  }

  public void Stop()
  {
    mIsWorking = false;
    mTimer.Change(Timeout.Infinite, Timeout.Infinite);
  }

  private void OnTimerTicked(object state)
  {
    if(mIsWorking)
    {
      DoSomethingLong();
      mTimer.Change(100, Timeout.Infinite);
    }
  }
}

Wednesday, January 28, 2015

Unity: Tips for optimizing performance for C#

This post discusses some tips on how to optimize performance in C# Unity programming:

1. Uses foreach() as infrequent as possible. foreach(...) is bad in Unity programming, the foreach(...) loop generates 24 bytes of garbage memory. If you are using a array or list object in C#, then you can use for loop to replace foreach loop. If you are using other collection classes such Dictionary and HashSet, then uses GetEnumerator() from the collection object and while loop to replace it.

2. Uses DateTime.UtcNow to replaces DateTime.Now for tasks such as tracking elapsed time and so on. DateTime.Now consumes more computational resources than DateTime.UtcNow.

3. Overrides OnBecomeInvisible() of the MonoBehavior class to implements logics that hide and stop some proccessing of the game object whenever it becomes invisible (Note that the game object should have a Renderer component for this method handler to be invoked during runtime).

4. Create and Destroy object using Instantiate and Destroy during runtime can be expensive and slow down the frame rate. Apart from putting these operation in StartCoroutine, one workaround is creating a set of game objects at the beginning of the game and store them in a collection such as a Queue. Then instead of calling Instantiate during the game play, call the Dequeue() on the Queue to return a copy of the already created game object and invokes its SetActive(true) method. And instead of calling Destroy, call the Enqueue() on the Queue to store the game object back to the queue (Remember to call the game object's SetActive(false)). This can be a performance hit

5. For a very large generic list of objects in stored in a collection, performance will be gained when a number of collections is used to store the objects (each of them store one of its property, for example). In my personal experience, I used to have List<Employee> collection object in Unity game, where the number of Employee stored in the list is close to 9 millions. Trying to add or remove Employee object from this List<Employee> collection becomes extremely slow. In the end, what I did was to designed a generic collection class, CustomizedList, resembling List<Employee>. The Employee class can be something like the following:

class Employee
{
  public int Age;
  public int YearsOfExperience;
  public float Salary;
  public string Occupation;
  public string ID;
  public Employee()
  {
      ID = Guid.NewGuid();
  }

   public override int GetHashCode()
   {
       return ID.GetHashCode();
   }

    public override bool Equals(Object rhs)
    {
       if(rhs is Employee)
       {
            Employee rhs1=rhs as Employee;
            return ID=rhs1.ID;
        }
        return false;
    }
}

and my generic class looks something like this (Note that this is a demo class):

class CustomizedList
{
  public List<int> Age = new List<int>();
  public List<int> YearsOfExperience = new List<int>();
  public List<float> Salary = new List<float>();
  public List<string> Occupation = new List<string>();
  public List<string> ID= new List<string>();

  public void Add(Employee e)
  {
     Age.Add(e.Age);
     YearsOfExperience.Add(e.YearsOfExperience);
     Salary.Add(e.Salary);
     Occupation.Add(e.Occupation);
     ID.Add(e.ID);
  }
 
   public Employee this[int index]
   {
         Employee e=new Employee();
         e.ID = ID[index];
         e.Age=Age[index];
         e.Salary =Salary[index];
         e.Occupation=Occupation[index];
         e.YearsOfExperience=YearsOfExperience[index];

         return e;
   }

    public void RemoveAt(int index)
    {
          Age.RemoveAt(index);
          ID.RemoveAt(index);
          Salary.RemoveAt(index);
          Occupation.RemoveAt(index);
          YearsOfExperience.RemoveAt(index);
    }

    public int IndexOf(Employee e)
    {
          return ID.IndexOf(e.ID);
    }
 
     public void Remove(Employee e)
     {
           int index = IndexOf(e);
           RemoveAt(index);
     }

     public int Count
     {
           get
           {
                 return ID.Count;
           }
     }

     public Employee Iterate()
     {
            for(int i=0; i < Count; ++i)
            {
                 yield return this[i];
            }
     }
}

The basic concept is very simple decomposes the Employee objects into its properties, each of which is stored in a separate list when Add(Employee e) method is called. However, CustomizedList has tremendous increase in performance when compare to the usage of List<Employee> when the number of items stored is extremely large. Of course when processing such a large collection, StartCoroutine is required as a time slice method for long processing (please refers to http://czcodezone.blogspot.com/2015/01/unity-use-startcoroutine-to-perform.html).

Thursday, January 22, 2015

Unity: Use PersistentDictionary and ESENT to store large collection object in Unity

This post shows how to add ESENT to Unity game and how to use PersistentDictionary in ESENT to store a very large collection of objects in Unity game.

Firstly, we need to download ESENT and make it available to Unity game development, double-click any C# script in the Unity project panel to bring up the Visual Studio, right-click the project in the Visual Studio and select "Managed NuGet Packages...". In the "Manage NuGet Packages ...", key in "ESENT" to search for the Extensible Storage Engine, and click the "Install" button for the first result (which is "ManagedEsent 1.6" in my case) coming up. This will install the ESENT references for development in Visual Studio.

Next we need to make ESENT libraries available to Unity. To this end, create a new folder under "Assets" in the Unity project panel (e.g., name it "References"). Now go to the "Packages\ManagedEsent.1.6\lib\net20" folder in your Unity project folder, and drag the "Esent.Collections.dll" and "Esent.Interop.dll" into the "References" folder in the Unity project folder. Upon this, Unity will now recognize the ESENT library and you can use it in C#. Below is a C# code snippet which shows how to uses a PersistentDictionary object from ESENT to store a large number of objects.

using Microsoft.Isam.Esent.Collections.Generic;
using UnityEngine;

public class Employee
{
 public string ID;
 public override string ToString()
 {
  return ID;
 }
 public static Employee ParseEmployee(string serializedContent)
 {
  Employee person = new Employee();
  person.ID = serializedContent;
  return person;
 }
}
public class EmployeePool 
{
 private string mID;
 protected PersistentDictionary<string, string> mData = null;

 public EmployeePool(string id)
 {
  mID = id;
  
 }

 public void Add(Employee person)
 {
  if (mData == null)
  {
   CreatePersistentDictionary<string, string>(ref mData, mID);
  }
  mData[person.ID] = person.ToString();
 }

 public void Clear()
 {
  CreatePersistentDictionary<string, string>(ref mData, mID);   
 }

 private static void CreatePersistentDictionary<T, V>(ref PersistentDictionary<T, V> current, string directory)
    where T : IComparable<T>
 {
  string full_directory_path = Path.Combine(Application.persistentDataPath, directory);

  if (PersistentDictionaryFile.Exists(full_directory_path))
  {
   PersistentDictionaryFile.DeleteFiles(full_directory_path);
  }

  current = new PersistentDictionary<T, V>(full_directory_path);
 }

 private static void DeletePersistentDictionary<T, V>(ref PersistentDictionary<T, V> current, string directory)
  where T: IComparable<T>
 {
  string full_directory_path = Path.Combine(Application.persistentDataPath, directory);

  if (PersistentDictionaryFile.Exists(full_directory_path))
  {
   PersistentDictionaryFile.DeleteFiles(full_directory_path);
  }
  current=null;
 }

 public int Count
 {
  get
  {
   if (mData == null)
   {
    return 0;
   }
   return mData.Count;
  }
 }

 public void Remove(Employee e)
 {
  mData.Remove(e.ID);
 }

 public Employee this[string index]
 {
  get
  {
   if (mData.ContainsKey(index))
   {
    return Employee.ParseEmployee(mData[index]);
   }
   return null;
  }
 }

 public IEnumerable<Employee> Enumerator
 {
  get
  {
   foreach (string key in mData.Keys)
   {
    yield return this[key];
   }
  }
 }
}

As PersistentDictionary is quite peculiar about the key type and the value type, in this particular case, each of the Employee object is given a id which is a string and serves as the key for the PersistentDictionary as it has a IComparable interface already. the Employee object itself is serialize into a string to be store (the serialization can be a JSON string, e.g.), the Enumerator function allows each Employee object in the collection to be iterated.

One thing to note is the CreatePersistentDictionary method, the method is implemented such that whenever a collection is created with an existing mID, the old data stores in the database with that mID as name will be wiped out. This is intended to let user starts with an empty database when clear is called (all when the constructor is called).